How to store Christmas decorations without crushing, tangling, or fading them
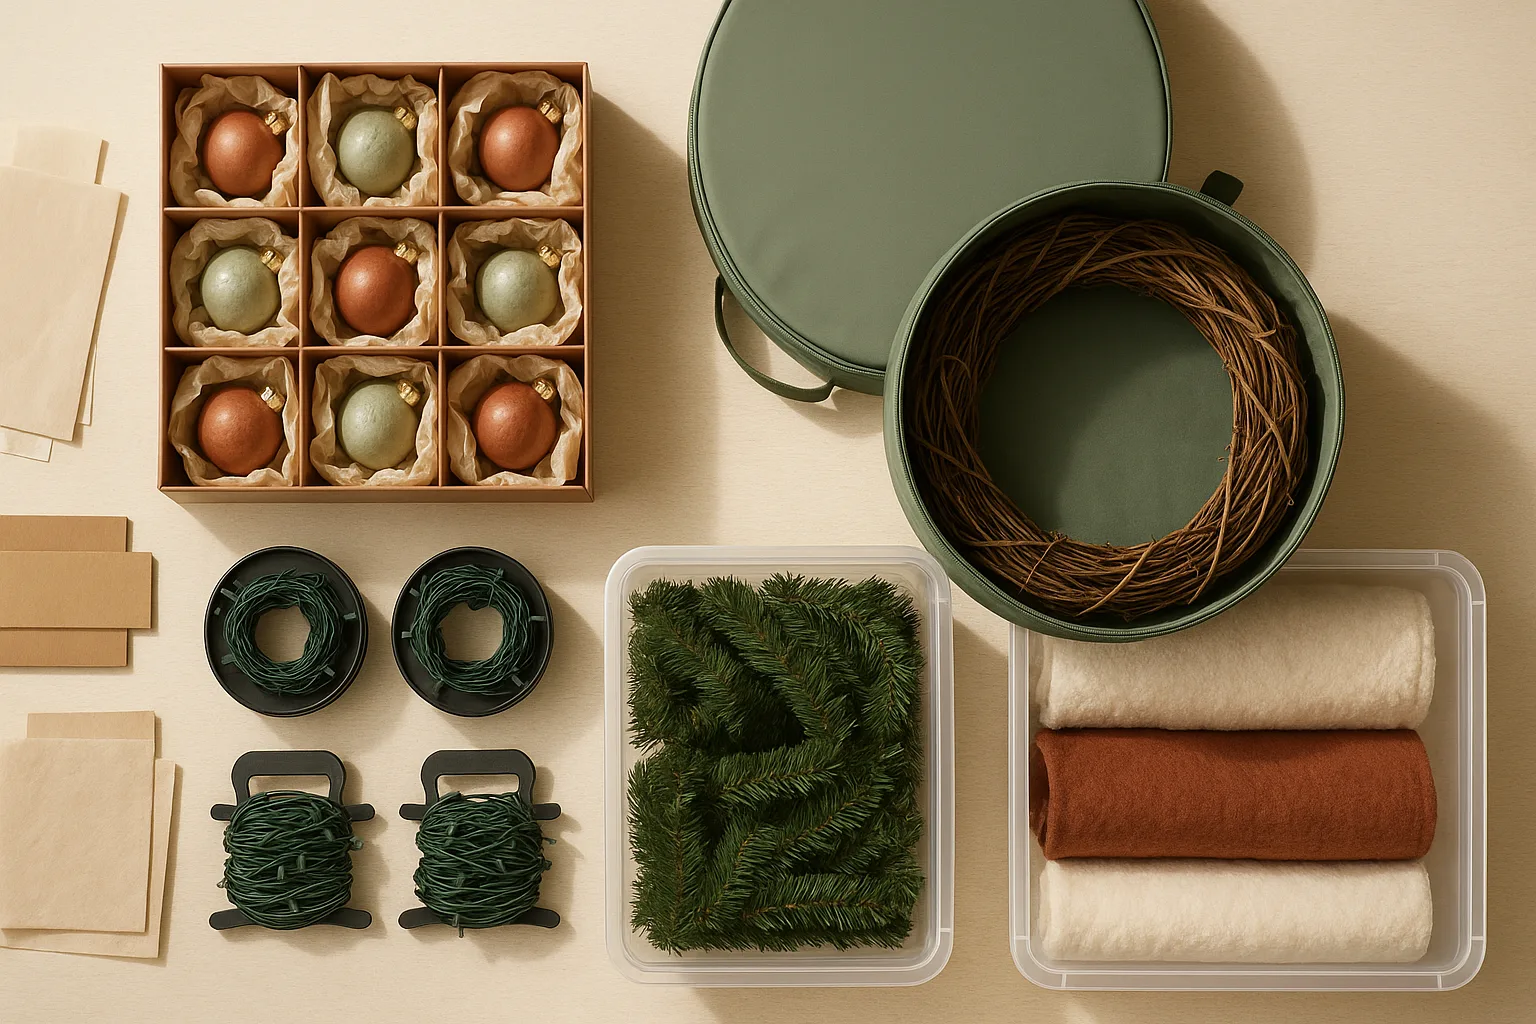
The storage system that actually works separates your decorations into four container types: divided ornament boxes for fragile glass, hard-sided boxes or round containers for wreaths, clear lidded polypropylene bins for soft décor, and cord reels or cardboard wrap cards for lights. If you are choosing storage bins through a home organization affiliate or comparing holiday storage accessories, match the container to the risk instead of buying one big catchall bin; otherwise you will open it next November to find shattered glass, a flat wreath, and a solid knot of lights.
Beyond the container choices, three environmental threats destroy holiday décor in storage: moisture, pressure, and UV exposure. Keeping storage-area humidity between 30–50% helps prevent mold and mildew in stored items; packing bins too full transfers crush pressure to whatever is underneath; and storing décor in direct sunlight accelerates color fading and finish cracking on glass, foil, and fabric pieces. All three problems are preventable with the right containers, the right location, and a labeling system that makes next year's setup faster than this year's teardown.
At a Glance: - Cost: $40–$120 for a complete storage kit - Skill level: No tools needed - Key supplies: Divided ornament boxes, wreath box, clear lidded bins, cord reels, silica gel packets, acid-free tissue paper, label maker or permanent marker
What kind of container each Christmas decor category needs
The container has to match the physical risk profile of the décor inside it. Rigid walls block crush pressure. Divisions keep fragile items from colliding. Clear sides let you see contents without opening every bin. If you are shopping through a storage bins affiliate or browsing holiday storage accessories, here is the category breakdown:
| Décor Category | Container Type | Why It Works |
|---|---|---|
| Glass ornaments | Divided ornament box | Individual compartments stop glass-on-glass contact |
| Wreaths | Hard-sided box or round container | Rigid walls hold circular shape under stack weight |
| Garlands, stockings, soft décor | Clear lidded polypropylene bin | See-through sides speed retrieval; lid keeps moisture out |
| Light strands | Cord reel or cardboard wrap card | Prevents tangles and wire kinks during storage |
| Tree topper, tabletop figurines | Individual acid-free tissue wrap + divided bin | Padding absorbs shock; compartments prevent chipping |
Rigid walls vs. soft bags: A fabric storage bag feels luxurious at the store and costs less than a hard bin, but rigid, stackable containers are meaningfully more protective for anything that can crush or chip. Soft bags transmit every pound of weight from the bin stacked on top directly to the contents. Reserve soft bags for items that cannot break and do not have a fixed shape you need to maintain — a set of kitchen towels with a holiday print, for example. Everything fragile, every wreath, every set of lights goes in a hard-sided container.
Divided ornament boxes for fragile glass ornaments
Glass ornaments chip and crack when they knock together, and that happens in a regular bin every time someone moves a stack. Divided ornament boxes — available at The Container Store, Target, Amazon, and Michaels in sizes ranging from 16 to 64 compartments — give each ornament its own cell. If you are comparing storage bins affiliate links for divided-box options, the IRIS USA ornament storage box (around $25–$30 at Target and Amazon) uses individual lift-out trays with adjustable dividers, which works well for a mixed collection of small and large ornaments.
Pick a box where each compartment is slightly larger than your biggest ornament, not tightly sized — you need room to add a layer of padding. Crumple acid-free tissue paper (about $8 for a pack of 25 sheets at Michaels) loosely around each ornament before dropping it into its cell. Acid-free matters because regular tissue paper can leave acidic residue that damages metallic finishes over months of contact. For very fragile or hand-painted pieces, wrap the ornament completely in tissue, then add a second layer of bubble wrap inside the compartment.
Pro Tip: Store the most fragile ornaments in the top tray of the divided box, not the bottom, so the weight of the lid above them is minimal. If your box has multiple lift-out trays, put lightweight glass on top and heavier resin or fabric ornaments on the lower trays.
Wreath boxes and hard-sided rounds for wreaths and garlands
A wreath crushed under a stack of bins will not spring back to a full circle. Pressure is the only real threat here — rigid, hard-sided storage is the fix.
Wreath storage boxes come in two forms. Flat rectangular boxes (Zober and StorageMaid both make popular versions, $20–$35 on Amazon) lie horizontally and stack efficiently on a shelf. Hard-sided round containers (the IRIS USA wreath storage bag with a hard bottom, around $25; the Elf Stor Premium wreath box, around $20–$28) match the circular shape of the wreath more precisely and reduce how much the branches compress. For a standard 24-inch wreath, look for a container labeled 24–26 inches in diameter. For an oversized 30-inch or 36-inch wreath, go up a size rather than forcing the wreath into a too-small box.
For artificial garland, do not crush it into a general bin. Fold it in loose S-curves inside a large clear bin and it will fluff back out in December. Never wind garland tightly around itself — tight winding bends the wire core and the branches won't recover their shape.
Watch Out: Do not stack heavy bins directly on top of a wreath box. Keep the wreath box on top of the stack or on its own dedicated shelf. The rigid walls protect from side pressure, but a 40-pound bin stacked on the lid can still deform the wreath inside.
Clear lidded bins for garlands, stockings, and soft decor
Garlands, stockings, table runners, throw pillows, and fabric ornaments can tolerate some gentle stacking pressure, so they do not need divided compartments — but they do need to stay dry and visible. Clear-lidded polypropylene bins solve both problems, and they are a smart pick if you are comparing home organization affiliate options for closet shelves, attic corners, or garage racks. Polypropylene (the material used in Sterilite, IRIS USA, and Rubbermaid Clears bins) is moisture-resistant, does not off-gas odors that affect fabric, and handles temperature swings in attics and garages better than thin, cheap bins.
Sterilite 66-quart latching bins (around $12–$15 at Target or Walmart) are a reliable choice for this category. The latch lid creates a tighter seal than a simple snap-fit lid, which matters if the bin is going into a garage or attic. For a closet, the simpler snap-lid version works fine.
Label each bin by holiday zone on the outside (more on this below) so you can grab exactly what you need without opening every bin. The clear sides will handle the rest — you can see the red-and-white stocking sticking out and confirm you have the right bin without touching a label.
Cord reels and cardboard wrap cards for Christmas lights
Loose-coiled light strands always tangle. Every time. The fix is wrapping each strand around a cord reel or a slotted cardboard wrap card before putting it in a bin, so the strand holds its shape and cannot knot around other strands.
Purpose-built cord reels with a center hub and locking slots (the ALED LIGHT cord reel and the Noma light reel are both available on Amazon for $8–$15) let you wind a 25- or 50-foot strand quickly and snap the ends in place. Cardboard wrap cards are free — cut a 6-inch-by-8-inch piece of cardboard, cut notches in each short end, and wrap the strand around the long axis, tucking the plug end into a notch. Each wrapped strand then goes into its own section of a clear bin, standing upright like a spool.
Secure both the plug end and the tail end before storing. An unanchored plug end will catch on adjacent strands and drag them loose during retrieval. A simple twist-tie or velcro strap does the job, and those little holiday storage accessories prevent the wrapped strand from unraveling in transit.
How to pack Christmas lights so they stay tangle-free next season
Tangles form when loose loops of wire are free to shift and catch each other during storage and transit. The wrapping method matters more than the container — a perfectly wrapped strand in a cheap bin beats a loose strand in an expensive one.
At a Glance: Light-Packing Step Sequence
- Plug the strand in and test it before you wrap anything. Replace burned-out bulbs and blown fuses now, while the strand is deployed. Check the fuse drawer on the plug (most standard incandescent strings have one). Michaels stocks replacement bulbs, fuses, and extension cord accessories if you need them.
- Remove the strand from the tree or structure completely and shake out any major kinks before you start wrapping.
- Anchor the plug end to your reel or cardboard form before you begin winding. Hook the plug cord into the first notch or slot so the starting point does not slip.
- Wind the strand in consistent figure-eight or over-under loops around the form. Figure-eight wrapping (alternating the direction of each loop) reduces the internal twist that causes knots when you unwind the strand next year.
- Secure the tail end into the second notch or slot, or fasten with a velcro strap. The tail end should not be able to unravel.
- Label the wrapped strand with a piece of masking tape: length (25 ft, 50 ft), color (warm white, multi), and location where it was used (front porch, tree base, mantel). That label saves five minutes of squinting at strands next year.
- Place each wrapped strand standing upright in a labeled clear bin. Do not pile them flat and loose — upright spools stay neat.
Wrap lights around a reel or cardboard form
Reels and cardboard wrap cards both outperform loose looping because the form creates consistent tension across the whole strand. Loose looping — gathering the strand into a rough bundle and tying it with a twist-tie — leaves uneven loops that tighten into knots over the months between December and November.
A reel is slightly faster to use if you have multiple sets of lights, and the locking slot keeps tension consistent without a separate fastener. Cardboard is free and disposable, which makes it a good choice if you are storing light sets you are not sure you will keep. Either works — the key variable is that the strand must be wrapped around a rigid form, not coiled loose.
Avoid stuffing light strands into a bin without wrapping — even a few minutes of handling will generate enough random movement to start knot formation.
Secure the plug ends and test the strand before storage
Before you seal the bin, check every bulb, fuse, and connection on each strand. Packing away a faulty strand means unpacking a faulty strand next November, when you have less time and patience to deal with it.
Pre-storage light checklist: - Strand lights up completely when plugged in - No flickering sections (sign of a loose bulb socket) - Fuse drawer on the plug is intact, fuses are not blown - No sections of cracked or brittle wire insulation - Plug prongs are straight and undamaged - Strand marked "Toss" if any of the above fail — do not re-store broken sets
Once the strand passes the check, use a velcro cable strap or a single twist-tie to fasten the plug end securely to the reel so it cannot unwind during storage. A single loose plug end catching on adjacent wraps is enough to create a tangle by the time you open the bin.
How to keep Christmas decorations from fading, mildew, and heat damage
The storage location you choose determines how hard your container has to work. A climate-controlled interior closet is the easiest environment to protect décor in. An uninsulated garage or attic introduces three specific threats — heat, UV exposure, and humidity — that will degrade colors, finishes, and fabrics over multiple seasons even with good containers.
UMN Extension identifies excess home moisture as producing condensation, mildew, mold, peeling paint, and excessive dust mites in indoor spaces. Those same conditions apply to storage areas: a damp garage or a humid attic creates an environment where fabric décor mildews, cardboard boxes disintegrate, and metallic finishes on glass ornaments oxidize. The fix is not just picking a dry-looking spot — it is using sealed polypropylene containers that resist moisture transfer, adding silica gel packets to bins that will experience temperature swings, and never using damp or previously wet cardboard as a storage material. If you are comparing home organization affiliate listings, choose bins and closet systems that keep those moisture-prone items off the floor and out of direct light.
Direct sunlight causes fading through UV exposure, and heat accelerates the chemical breakdown of dyes, metallic paints, and synthetic materials. A red velvet stocking stored in a south-facing attic window for ten months will look noticeably duller by its third or fourth season. The solution is shading the storage location or at minimum storing décor in opaque bins if the space has light exposure. Holiday storage accessories such as silica gel packets and moisture indicators add another layer of protection when the space is not climate-controlled.
Attic storage: how to reduce heat and sunlight exposure
Attic storage is workable for Christmas decorations, but it is the hardest environment to control. Attic temperatures in summer can reach 130°F or higher in many US climates — hot enough to warp plastic, melt adhesives on decorated pieces, and accelerate the breakdown of fabric dyes. Direct sunlight through attic vents or windows compounds the problem.
If the attic is your only option, use rigid, lidded polypropylene bins rather than cardboard boxes (cardboard absorbs heat and moisture and offers no structural protection). If you are shopping through a home organization affiliate or looking for a tidy attic rack setup, place bins away from roof lines where radiant heat is highest — toward the interior center of the attic floor is cooler. Add two to four silica gel packets (available in 10-gram sizes, sold in bulk on Amazon for around $8–$12 per 50-pack) to any bin going into the attic. Position bins so they are not in direct sunlight from any attic windows or vents.
Watch Out: Do not store wax candles, battery-operated items with lithium batteries, or anything with foam backing in an unventilated attic. Heat can melt wax, cause battery swelling, and degrade foam. Move those items to a cooler interior location.
Delicate heirloom ornaments, hand-painted pieces, and expensive fabric décor should not go into the attic at all if you have any other option. The temperature and UV risk over multiple seasons adds up.
Garage storage: how to handle humidity and seasonal temperature swings
A garage introduces humidity as the primary threat, along with significant temperature variation between summer highs and winter lows. Moisture in a garage environment promotes mildew on fabric décor and softens cardboard boxes until they collapse under their own weight. Cardboard is not a safe storage material for a garage — period. Even a box that looks dry can absorb enough ambient humidity over months to start growing mold inside.
Use sealed rigid polypropylene bins with latching lids for everything in the garage. The latch seal is not perfectly airtight, but it is significantly better at blocking humidity infiltration than a snap-fit lid. For extra protection on delicate or fabric items, include silica gel packets and check them at the start of each season — once they are saturated, they stop working. Rechargeable silica gel packets (the blue-bead type that turns pink when saturated) can be refreshed in a low oven for about an hour and reused.
Keep storage bins off the garage floor on shelving — concrete floors wick moisture, and a bin sitting directly on concrete will absorb ground-level humidity through the base. A basic metal shelving unit (Gladiator, Edsal, or the Husky 5-tier shelving from Home Depot, $40–$80) raises bins at least 12 inches off the floor and makes the collection easier to access.
Pro Tip: If your garage runs humid in summer, a small dehumidifier on a timer (like the hOmeLabs 35-pint, around $130–$150 on Amazon) can keep the space in the 30–50% humidity range that prevents mildew in stored items. Run it during the months when outdoor humidity is highest.
Closet storage: the most convenient option for frequently used decor
An interior closet — particularly a hall closet, bedroom closet, or under-stair storage space — is the most protective environment for holiday décor. Temperatures are stable, humidity is low, and there is no UV exposure. The only challenge is usually space.
Stackable, rigid clear bins make the most of limited closet depth. Stack ornament boxes and light bins on upper shelves where they are out of the way but accessible with a step stool. Put the bins you reach for first — the ones labeled "Tree" and "Mantel" — at eye level or on the most accessible shelf. Wreaths in round containers can stack on a high shelf if the container has a flat bottom.
For closets where vertical space is limited, a rolling cart or a set of cube organizers lets you slide individual bins out without destacking everything. The IRIS USA 3-shelf rolling cart (around $30 at Target) works well for a small collection in a hall closet.
How to label Christmas storage bins by room, year, and condition
A good labeling system is what makes the difference between a holiday setup that takes two hours and one that takes all day. The goal is to grab the right bin on the first try and know instantly whether everything inside is in usable condition.
Use a label maker (the Brother P-Touch Cube, around $30 at Target, prints clean labels that stick to polypropylene reliably) or a permanent marker on masking tape if you prefer to keep costs down. Whatever method you choose, put labels on the short end of each bin so they are readable when bins are stacked facing you.
Label bins by holiday zone: tree, mantel, table, or outdoor
Organize your collection by where the décor is used, not by what it is. Zone-based labels — Tree, Mantel, Table, Outdoor, Entryway — mean you can pull exactly the bins you need for a specific room without sorting through everything.
Examples of zone-based labels: - Tree — Ornaments A (first set of ornament boxes) - Tree — Ornaments B (second set, if you have a large collection) - Tree — Lights (light strands used specifically on the tree) - Mantel (garland, candle holders, mantel décor) - Table (centerpieces, chargers, tablecloths) - Outdoor — Lights (porch, yard, and roofline light strands) - Outdoor — Décor (wreath, lanterns, yard stakes)
Keep the Tree bins and Mantel bin at the most accessible position in your storage space — those are almost always the first ones you open. Push Outdoor bins to the back or top of the stack since those go up early and come down last.
Add year and condition tags so you can cull broken items annually
Add a secondary tag to each bin — or to individual items inside — that records the year packed and a condition status. A simple system works: Keep, Repair, or Toss.
Example tag format: Packed: 2025 | Status: Keep Packed: 2025 | Status: Repair — missing ornament hook Packed: 2025 | Status: Toss — cracked base
The year tag matters because it tells you how long items have been in storage and helps you spot things that have been sitting in "Repair" status for multiple seasons without ever getting fixed. If something has been tagged "Repair" for two consecutive years, it is probably time to toss it.
Run a quick annual purge before you pack the bins away: - Broken ornaments with chipped paint or missing hooks → Toss - Light strands that failed the plug-in test → Toss - Faded or stained fabric pieces that you would not display → Toss - Duplicate pieces from a set where the rest are gone → Toss - Anything you did not actually use this season → Donate or Toss
This takes about fifteen minutes and reduces next year's storage footprint by a meaningful amount.
Christmas decoration storage mistakes that cause breakage and fading
Most storage damage happens from one of three causes: too much weight pressing on fragile items, moisture infiltrating containers, and UV or heat degrading colors and finishes over months of exposure. Each one is predictable and preventable.
Common storage mistakes checklist: - Mixing ornaments and heavy décor in the same bin without divisions - Using old cardboard boxes that have absorbed moisture - Overpacking bins until the lid bows or the sides bulge - Stacking heavy bins directly on top of wreath boxes - Storing any bin in direct sunlight in an attic or near a garage window - Coiling light strands loose without a reel or wrap form - Packing away light sets that failed the plug-in test - Skipping silica gel packets in bins stored in attics or garages - Using soft fabric bags for wreaths or fragile ornaments
Why overfilled bins crush ornaments and wreaths
A bin's rigid walls only protect contents when the bin is not under stress. Overpacking a bin until the lid bows means that every bin stacked on top transfers its weight directly down through the contents, not through the structural walls. The wall can no longer deflect the force.
The practical fill rule: close the lid without forcing it. If you have to push down on the lid to get the latch to catch, the bin is overfull. Remove one item, shift the padding, or move to a larger container. The five minutes it takes to repack correctly is worth it relative to opening a bin to find a shattered glass ornament.
For wreaths specifically, pressure is the primary damage mechanism. A wreath in an undersized box compresses the branches and wire frame into a permanently deformed shape. The wreath does not spring back — it holds whatever shape it spent the last ten months in.
Why damp containers and direct sunlight ruin décor
UMN Extension research on moisture and mold identifies mildew and mold as direct symptoms of excess moisture in household storage environments. A cardboard box that looks dry but has been sitting in a humid garage is actively wicking moisture into whatever is packed inside it — and mildew can start growing on fabric at humidity levels above 60% with as little as 24–48 hours of exposure at warm temperatures.
Never use damp cardboard, previously wet containers, or any packaging that smells musty. The smell is a reliable mildew indicator.
Direct sunlight and heat degrade décor through different mechanisms: UV radiation breaks down the dye molecules in fabric and painted finishes, while heat softens adhesives, warps plastics, and accelerates the oxidation of metallic finishes on glass ornaments. A faded red velvet ribbon or a dulled gold ornament finish is usually the cumulative result of multiple storage seasons in a poorly shaded attic or sunny garage corner.
The fix for both is the same: sealed polypropylene bins, shaded storage location, and silica gel packets for any space that runs humid.
Christmas decoration storage checklist before you seal the bins
Run through this checklist once before you stack and move bins away for the season.
Ornaments and fragile décor: - [ ] Each ornament is in its own divided compartment - [ ] Acid-free tissue paper wrapped around each glass piece - [ ] No ornament is resting directly against another - [ ] Most fragile items are on the top tray of the divided box
Wreaths and garlands: - [ ] Wreath is in a rigid box or round container sized to fit - [ ] Garland is loosely S-folded, not tightly wound - [ ] No heavy bins will be stacked on top of the wreath box
Lights: - [ ] Every strand passed the plug-in test - [ ] Each strand is wrapped on a reel or cardboard form - [ ] Plug end and tail end are secured with velcro or twist-tie - [ ] Each strand is labeled with length, color, and location
Soft décor (garlands, stockings, table linens): - [ ] Bins are dry inside before packing - [ ] Items are clean and dry before storing (mildew starts with damp fabric) - [ ] Silica gel packet added to any bin going into garage or attic
Containers and labels: - [ ] All bins are labeled by zone (Tree, Mantel, Table, Outdoor) - [ ] Year and condition tags are updated or added - [ ] Lids are fully latched, not just resting on top - [ ] No damp or damaged cardboard boxes used anywhere in the stack
Location: - [ ] Bins are off the floor on shelving in the garage - [ ] No bins in direct sunlight in attic or near garage windows - [ ] Heaviest bins are on the bottom of any stack; wreath boxes are on top
Frequently asked questions about storing Christmas decorations
How do you store Christmas decorations without breaking them?
Use divided ornament boxes with individual compartments for glass and fragile pieces — each ornament needs its own cell with acid-free tissue paper padding. Never pack ornaments loose in a general bin, and do not overfill any bin to the point where the lid bows. Rigid, stackable polypropylene bins with flat, load-bearing walls protect contents far better than soft fabric bags or cardboard boxes, which transmit pressure and absorb moisture.
What is the best way to store Christmas lights so they don't tangle?
Wrap each strand around a cord reel or cardboard wrap card before storing — a reel holds the strand in consistent loops and prevents the random movement that causes knots. Secure both the plug end and the tail end before placing the reel in a bin. Store wrapped strands upright in the bin, standing like spools rather than lying flat. Test every strand before you wrap it so you are not storing broken lights.
Can you store Christmas decorations in the attic or garage?
Yes, with the right containers and precautions. Both locations introduce risks that an interior closet does not: attics get extremely hot and may have UV exposure from vents or windows; garages run humid and go through wide temperature swings. In either location, use sealed rigid polypropylene bins with latching lids (not cardboard), keep bins off the floor on shelving, add silica gel packets, and position bins away from direct light. Heirloom or particularly delicate décor is better stored in a climate-controlled interior space.
How do you keep wreaths from getting crushed in storage?
Store every wreath in a hard-sided wreath storage box or round container sized to match the wreath diameter — 24-inch wreaths need a 24–26-inch container. The rigid walls hold the circular shape and prevent the branches from compressing under stack weight. Do not stack heavy bins on top of the wreath box; keep it on top of the stack or on its own shelf. A wreath compressed into a misshapen position for ten months will not fully recover its original form.
How do you prevent holiday décor from fading in storage?
Fade comes from UV exposure and heat. Keep stored décor away from direct sunlight and away from high-heat areas like attic roof lines or south-facing garage windows. Opaque bins block light even in bright storage areas. Maintaining storage humidity between 30–50% also helps, because excess moisture accelerates the breakdown of metallic finishes and dyes. Silica gel packets help regulate humidity inside individual bins.
Sources & References
- Storage.com — How to Store Christmas Decorations — Broad storage guidance covering container types, location selection, and common mistakes
- Storage.com — Prevent Mold and Mildew in Storage Units — Humidity range guidance for mold and mildew prevention in stored items
- UMN Extension — Controlling Moisture Problems in Your Home — Research-backed guidance on household moisture, mildew, and mold conditions
- The Container Store — Christmas Gift Wrap & Storage — Product reference for divided ornament boxes, wreath containers, cord reels, and clear bins
- Michaels — Christmas Light Accessories — Replacement bulbs, fuses, and light storage accessories
Keywords: divided ornament boxes, wreath storage box, hard-sided round wreath container, clear lidded storage bins, cord reels, cardboard light wrap cards, silica gel packets, acid-free tissue paper, polypropylene storage bins, UV exposure, attic heat, garage humidity, closet storage, mildew prevention