A burst pipe can empty hundreds of gallons into your home in the first hour. According to State Farm, even a small crack can release hundreds of gallons of water, damaging the structure and everything inside it. The decisions you make in the next sixty minutes will determine how much of that damage is recoverable — and whether your insurance claim holds up.
What to do in the first hour after a burst pipe
Follow this StepCard-style sequence in order: stop the water, make the electricity safe, document the damage, protect your belongings, and call the right professionals. Every minute of additional flow expands the drying footprint and the mitigation bill, so speed is the organizing principle here.
Ready.gov warns that water intrusion can create both contamination and electrocution hazards simultaneously — two separate life-safety threats you must address before worrying about property damage. Keep that in mind as you move through the steps below.
- 0–10 minutes: shut off the main water and stop the spread
Your only goal in the first ten minutes is to stop active flow. Find your main water shutoff valve — typically located where the water line enters the house (the front of the basement, a utility closet, or the crawl space near the foundation). Turn it clockwise until the flow stops. If you have a ball-valve shutoff, a quarter-turn to perpendicular shuts it off completely.
Once the main is off, open a cold-water faucet on the lowest floor to bleed pressure from the lines. This stops residual water from continuing to drain out of the broken pipe.
Pro Tip: Know where your main shutoff is before a crisis. If your house has a curb shutoff at the street, a meter key (available at hardware stores for under $20) lets you turn off water at the meter if the interior valve fails or is inaccessible.
As Progressive notes, it's critical to stop the water immediately — the shutoff buys you time until a licensed plumbing service arrives to make the actual repair. Do not attempt to patch a burst pipe under pressure. That is the plumber's job.
When to Call a Pro: Call a licensed plumber immediately if you cannot locate or operate the main shutoff valve, if the burst is on the main supply line itself, or if the shutoff valve is corroded or broken.
- 10–20 minutes: cut power only where it is safe
Water and electricity are the combination most likely to turn a plumbing emergency into a life-threatening one. Ready.gov is explicit: "If there is a chance the electrical system may be wet, turn off the power at the main breaker box if it is safe to do so."
The critical qualifier is if it is safe to do so. Walk to your electrical panel only if the path is dry and the panel itself shows no signs of water contact. If you are standing in water, if water is dripping near outlets or light fixtures, or if the panel is in the affected area, do not touch anything electrical.
When to Call a Pro: If you see water near your electrical panel, outlets, or ceiling fixtures, or if the path to the panel is wet, call a licensed electrician and your water damage restoration company before re-entering that space. This is not a DIY judgment call — electricity and standing water are a fatal combination.
If you can safely reach a dry breaker box, shut off circuits serving the affected rooms. Leave whole-house power on if only isolated circuits are at risk; you'll need power for your phone, sump pump, and lighting in unaffected areas.
- 20–40 minutes: photograph damage before cleanup starts
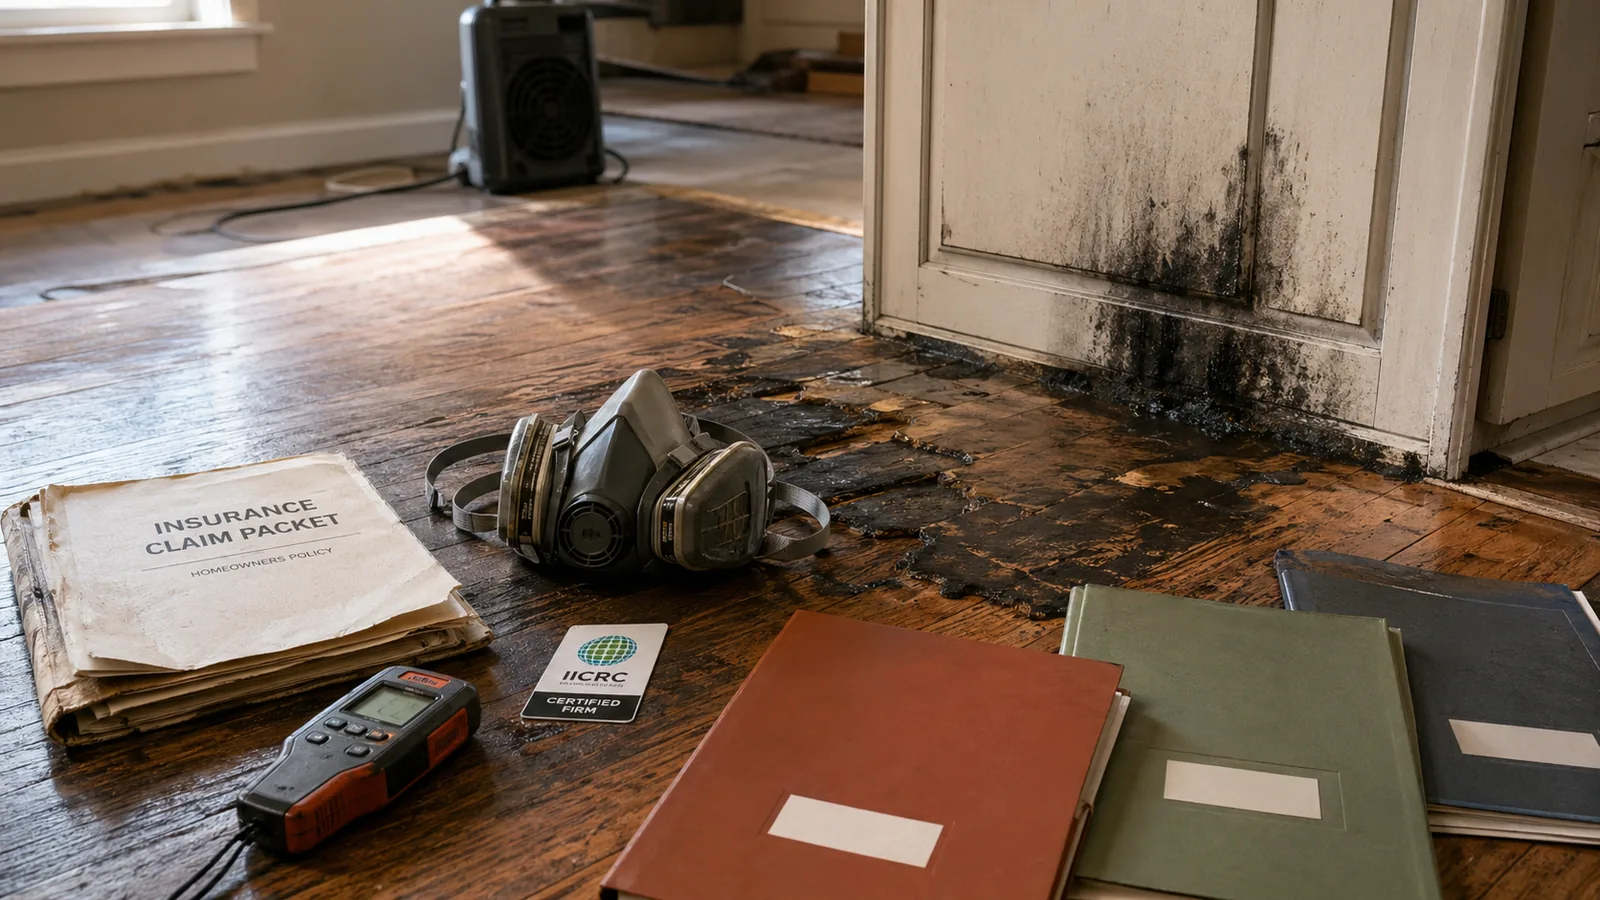
Your insurance claim lives or dies on documentation. Do this before you move a single piece of furniture or touch a wet towel.
Documentation checklist for your adjuster:
- Wide shots: Each affected room from the doorway showing the full scope of water spread
- Close-ups of the source: The burst pipe itself — its location, the break point, any corrosion or freeze damage
- Water level markers: Waterlines on walls, baseboards, and cabinetry
- Damaged belongings: Every saturated item in place, before it is moved or dried
- Floors and subfloor: Buckled hardwood, soaked carpet, warped laminate
- Ceiling damage: Sagging, staining, or collapse
- Timestamps on video: Walk through each room narrating what you see — adjuster-ready video is more useful than photos alone
- Meter/shutoff state: A photo of the shutoff in the closed position
The Insurance Information Institute advises: "Don't throw out damaged items until the adjuster has visited." That rule applies even to soaked carpet and wet drywall. If you must remove something for safety, photograph it first and move it to the garage rather than the dumpster.
Watch Out: Discarding water-damaged belongings before the adjuster sees them is one of the most common reasons supplement claims get denied. When in doubt, photograph it, bag it, and store it.
- 40–60 minutes: move valuables and call the right companies
With documentation complete, move dry or only lightly affected valuables away from the wet zone — to an unaffected floor, the garage, or a neighbor's house. Don't toss anything yet; just relocate it.
Now make two calls, in this order:
- A water damage restoration company — call first because extraction and containment should start before the pipe is even repaired. Many operate 24/7 emergency lines. Ask explicitly for emergency water extraction.
- A licensed plumbing service — to locate and repair the burst pipe. They may not arrive for an hour or more; that's fine, because mitigation can and should begin before they do.
- Your insurance company — once you've initiated the mitigation and have your documentation ready.
As Progressive confirms, "Call a professional plumber to repair the burst pipe and prevent further damage." That repair job and the restoration job are entirely separate trades — more on that below.
Who to call first: plumber, water mitigation company, or insurance
For insurance claim help, call the water damage restoration company first, then the plumber, then insurance. Here is why that order makes sense.
The mitigation crew's job is to stop your loss from growing — extracting standing water, setting up containment, and starting the drying process. None of that requires the pipe to be fixed first. The plumber's job is to fix the break. These are parallel, not sequential.
Insurance notification can wait until you've documented the scene and made your first emergency calls. Calling them while water is still running doesn't help you; calling with photos, a mitigation company on the way, and a claim script ready does.
[Image: Decision flowchart — Burst pipe response: Mitigation → Plumber → Insurance, with branch for "safe to enter?" and "electrical hazard?"]
What a plumber fixes versus what a mitigation crew restores
These two trades handle completely different scopes of work. Confusing them is one of the most common mistakes homeowners make — and it leads to either hiring only one or expecting one to do the other's job.
| Scope | Licensed Plumber | Water Mitigation Crew |
|---|---|---|
| Primary job | Locate and repair the burst pipe | Extract water, dry the structure |
| Tools | Pipe cutter, fittings, torch or press tool | Truck-mounted extractors, air movers, dehumidifiers |
| Standards | Plumbing code (state/local) | IICRC S500 Standard for Professional Water Damage Restoration |
| Handles demolition? | Only what's needed to access the pipe | Controlled demolition of wet drywall and insulation for drying |
| Documents for insurance? | May provide a repair invoice | Provides moisture logs, drying reports, scope of work |
The IICRC S500 is the professional benchmark for water damage restoration. It describes procedures for residential, commercial, and institutional buildings and covers both structural drying and personal property. Any reputable mitigation company should be working to S500 procedures — if they can't tell you what that standard is, that's a red flag.
When mitigation can start before the plumber arrives
Mitigation should start as soon as the water is off, regardless of whether the pipe is repaired yet. The restoration crew's first priority is reducing the loss footprint: pulling up saturated carpet, extracting standing water, and setting drying equipment in the affected rooms.
Watch Out: Every hour of delay in extraction expands the moisture migration into adjacent walls, floors, and ceiling cavities. Water travels farther than you can see. A puddle in the hallway may already have wicked into the subfloor, the wall framing behind the baseboard, and the ceiling of the room below.
The IICRC S500 frames water damage restoration as a procedure-based process that begins with containment and extraction — work that is entirely independent of pipe repair. Do not wait for the plumber to arrive before calling the restoration crew.
When to call your insurance company and what to say
Call your carrier once you have your documentation and the mitigation crew is either on the way or on-site. When you call, use this script structure:
Claim call checklist:
- State your full name and policy number
- Describe the loss as a "sudden, accidental burst pipe" (use that exact language if it accurately describes what happened)
- Give the date and approximate time the pipe burst
- Describe which areas of the home are affected
- State whether the home is currently habitable
- Tell them a mitigation company is on-site or en route
- Ask for your claim number before you hang up
- Ask whether they have a preferred vendor list (you are not required to use it, but knowing it matters)
- Ask about loss of use / ALE coverage if the house may be temporarily uninhabitable
As Travelers confirms, "Accidental water damage that occurs as a result of a sudden, unexpected occurrence like a burst pipe is often covered by a homeowners insurance policy." Using the right language from the start positions your claim correctly.
Can you dry wet drywall and insulation, or does it need removal?
Wet drywall and insulation usually need to come out — not be dried in place. This is the single most important technical distinction this article makes, and it's where most DIY cleanup attempts fail. Surface dryness means nothing if the wall cavity behind it is still wet.
The IICRC S500 governs how professional water damage restoration addresses structures and their contents — including concealed assemblies like wall cavities. The standard's approach is clear: restoration must address the actual moisture condition of the structure, not just what is visible on the surface.
Drywall, insulation, and concealed wall cavities often require controlled demolition and removal when moisture is trapped or materials are no longer restorable, and the IICRC S500 treats that drywall and insulation removal as part of proper water damage restoration when drying in place will not achieve a stable result.
Why fans and towels usually are not enough inside wall cavities
When water enters a wall through a burst pipe, it travels in directions you can't see. It wicks upward through drywall paper, sideways through insulation batts, and downward into the bottom plate and subfloor. The paper facing on standard drywall absorbs moisture and holds it for days. Fiberglass insulation traps water between fibers while feeling merely damp to the touch.
Running box fans in an affected room may dry the visible surface of the drywall within a day or two. The cavity between the drywall and the exterior sheathing — packed with insulation and framing — can stay saturated for weeks. If that moisture isn't removed, you will eventually have mold growth behind what looks like a dry wall.
Professional drying requires inspection and moisture verification using calibrated equipment, not just observation. Under IICRC standards, surface cleanup without confirmed cavity drying does not meet the restoration benchmark.
Watch Out: Vapor retarders (the plastic sheeting or kraft-faced insulation sometimes installed on exterior walls) can trap moisture between the retarder and the drywall. In that configuration, fans directed at the wall surface may actually slow evaporation from the cavity. This is one reason controlled demolition — removing the drywall to expose and dry the cavity directly — is often the faster, safer path.
Signs drywall, baseboards, or insulation should be removed
Replace rather than try to dry when you see or measure any of the following:
- Swelling or bubbling in the drywall surface or tape joints
- Sagging in a ceiling or wall section
- Brown or yellow staining indicating prolonged moisture contact
- Soft spots when you press on the drywall — it should feel rigid
- Musty or sour odor from the wall cavity
- Elevated moisture readings with a pin or pinless moisture meter — professional threshold is typically below 16% moisture content in drywall before it's considered dry
- Any visible mold on the surface or visible through a removed outlet plate
- Wet insulation confirmed by removal of a baseboard or outlet cover — wet batts should always be removed and replaced, not dried in place
Baseboards act as a moisture dam, holding water against the bottom of the drywall. Remove them early; they reveal the actual moisture line and allow the bottom of the wall cavity to breathe.
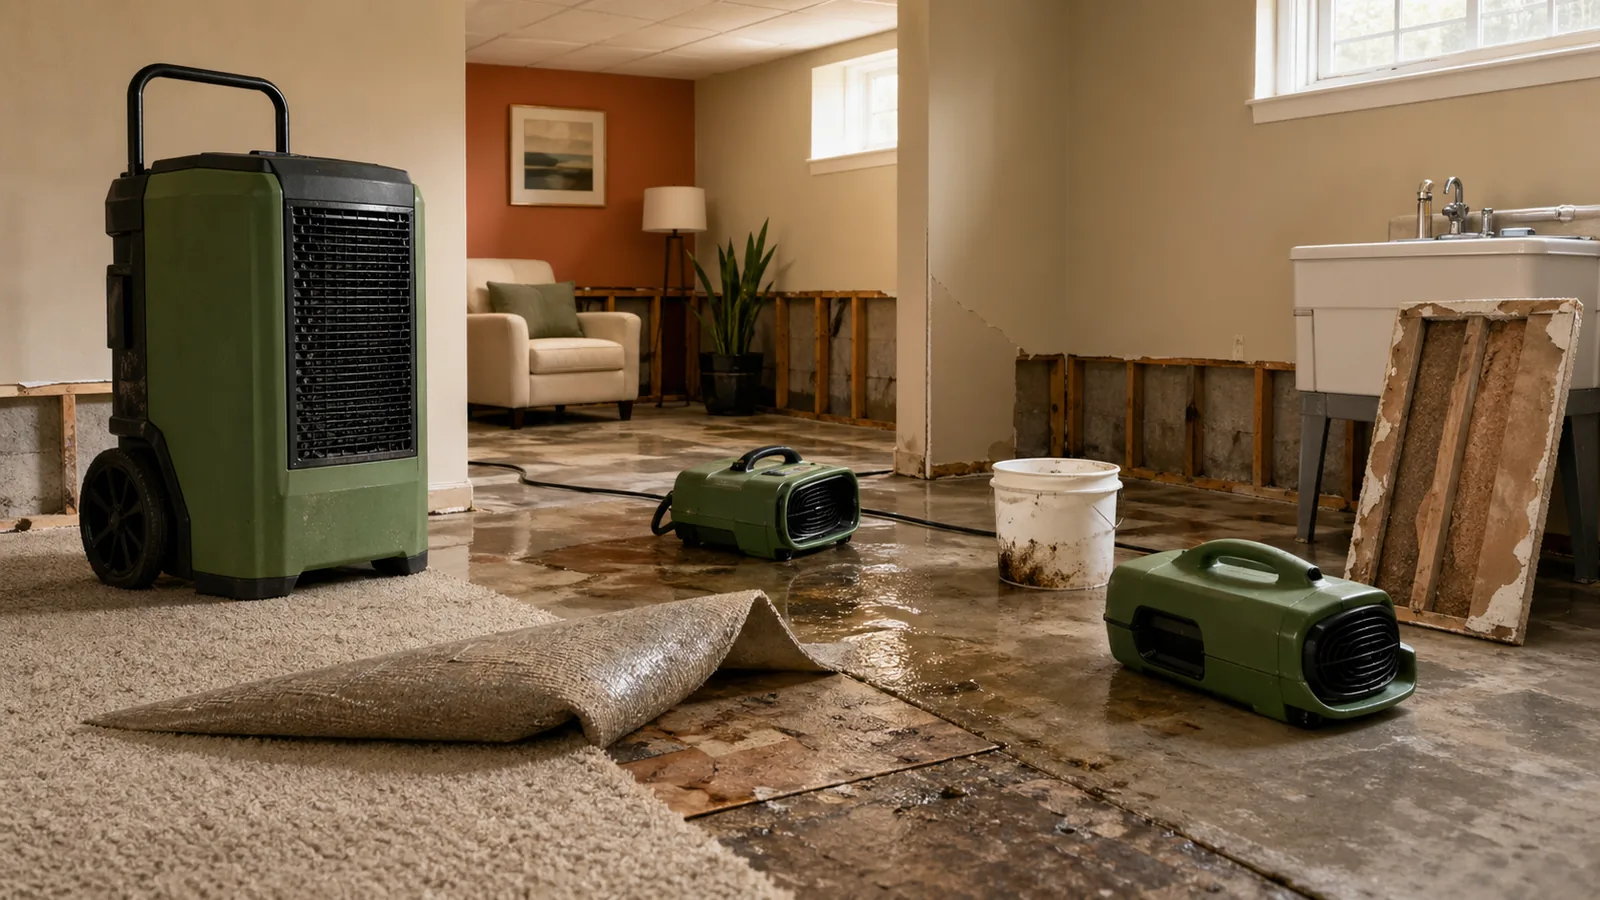
How professionals dry a house after a burst pipe
A professional mitigation crew following IICRC S500 procedures uses three categories of equipment working together:
Air movers (also called axial or centrifugal fans) are high-velocity, low-profile machines placed at the base of wet walls and across wet floors. They create rapid air movement across wet surfaces to accelerate evaporation. A typical residential loss might involve four to twelve air movers depending on the affected area.
Dehumidifiers pull the evaporated moisture out of the air and discharge it as water (either into a bucket or via a drain hose). Without dehumidification, air movers simply push humid air around the room without removing moisture from the building. Industrial LGR (low-grain refrigerant) dehumidifiers are significantly more effective than consumer hardware-store units.
Moisture meters are used to establish baseline readings on the day of loss and to verify drying progress at each monitoring visit. Pin meters measure resistance in wood framing and drywall; non-contact meters scan larger surface areas. The crew should log readings from consistent measurement points across the affected area at each visit — typically daily for the first three to five days.
Pro Tip: Ask the mitigation company to walk you through their moisture readings on day one and show you their drying targets. If they can't explain what number they're trying to reach and how they're measuring it, find a different crew.
Monitoring checkpoints usually happen every 24–48 hours. The drying plan is considered complete only when all readings return to within normal range for the materials in question — not when surfaces feel dry to the touch.
Does homeowners insurance cover burst pipe damage
Standard homeowners and renters insurance provides coverage for burst pipes, and standard homeowners policies do not cover flood damage. The Insurance Information Institute confirms: "Standard homeowners and renters insurance provides coverage for burst pipes, wind driven rain and damage resulting from ice dams on your roof."
Your HO-3 policy (the most common homeowners form in the US) provides "open perils" coverage on the dwelling structure, meaning it covers direct physical loss unless a specific cause is excluded. Sudden water damage from a plumbing failure is generally not excluded. Flood damage from rising external water is — always.
If you are sorting through insurance claim help, this is the point to confirm whether your loss is a sudden plumbing failure or something your policy treats as maintenance. Then call your carrier, document the scene, and follow their claim instructions without waiting for the paperwork to catch up.
Sudden and accidental water damage versus neglected leaks
The coverage hinge for burst pipes is whether the loss was sudden and accidental versus the result of ongoing neglect. This distinction is the most common reason burst-pipe claims get denied — and it's preventable with the right documentation.
Covered under sudden and accidental: - A pipe that freezes and bursts during a cold snap with no prior history of cold-weather issues - A supply line to a washing machine or toilet that fails without warning - A water heater pipe that ruptures due to pressure buildup - A fitting that fails suddenly in a recently renovated bathroom
Not covered — maintenance neglect: - A pipe that had been visibly corroding or dripping for months before bursting - A slow leak behind a wall that was noticed but not repaired and eventually caused structural damage - A supply line that showed signs of wear or age-related deterioration that a reasonable homeowner would have addressed
As Progressive states, "If the pipe burst due to neglect or lack of maintenance, your homeowners policy typically won't cover the damage." The adjuster will ask questions about whether you knew about prior leaks, corrosion, or water staining. Answer honestly and document the sudden nature of the event with photos and timing evidence.
Why flood insurance usually does not apply to an indoor pipe burst
Flood insurance and homeowners water damage coverage address entirely different types of loss. As the Insurance Information Institute notes, "Standard homeowners and renters insurance does not cover flood damage," and flood coverage under the National Flood Insurance Program (NFIP) or private flood policies is designed for rising external water — storm surge, river overflow, heavy rainfall accumulation on the ground.
A pipe that bursts inside your house is an internal plumbing failure. It is not a "flood" under insurance definitions regardless of how much water ends up on your floor. Your HO-3 is the right policy to call; your flood policy (if you have one) does not apply.
One more point from Ready.gov: flood insurance typically takes up to 30 days to go into effect, which reinforces why post-loss decisions must correctly identify whether the source is a plumbing failure or an external flood event. Calling the wrong policy wastes time.
What to save for the adjuster: receipts, photos, readings, and mitigation docs
The Insurance Information Institute advises: "To substantiate your loss, prepare an inventory of damaged or destroyed items and give a copy to the adjuster along with copies of any receipts."
Claims evidence checklist:
- Date/time-stamped photos and video from immediately after discovery, before any cleanup
- Damaged item inventory — description, approximate age, estimated replacement cost, and original receipt if available
- Plumber's invoice identifying the location and cause of the pipe failure
- Mitigation company's daily moisture logs with before/after readings at all measurement points
- Mitigation company's final scope-of-work and invoice itemizing extraction, equipment, demolition, and monitoring
- Receipts for emergency expenses — hotel, laundry, pet boarding — if you were displaced
- Contractor estimates for structural repair once the structure is dry
- Any prior home inspection reports that reference plumbing condition (useful for establishing no known prior issues)
Do not throw away damaged materials until the adjuster has either inspected them or explicitly given you clearance. Move them to the garage, not the curb.
How long does it take to dry out a house after a burst pipe
There is no single fixed timeline for water damage restoration after a burst pipe; drying is a monitored restoration process that uses professional equipment and moisture verification. A typical residential burst-pipe loss takes three to five days to dry under professional conditions with industrial equipment. But that range assumes the water source was clean, the affected area is reasonably contained, and demolition happens where needed. Wall cavities, subfloor assemblies, and insulation can extend the drying period to seven to ten days or longer.
The IICRC S500 frames structural drying as a monitored process with a drying goal, not a time goal — the job is complete when moisture readings reach their targets, not when a calendar number is reached. That is why water damage restoration companies document readings rather than promising a single universal finish date.
What changes the drying time: wall cavities, insulation, flooring, and weather
Material factors:
- Drywall: Standard 1/2-inch drywall that is soaked through typically takes three to five days to dry if the cavity behind it is open. If the cavity is closed and insulated, expect longer — or expect demolition.
- Subfloor (plywood or OSB): Three to seven days under active drying. OSB is more moisture-sensitive than plywood and swells more quickly; early extraction reduces irreversible damage.
- Hardwood flooring: The most unpredictable material. Even with aggressive drying, cupped or buckled hardwood may require full replacement. Early intervention — within 24–48 hours — gives the best odds of saving it.
- Fiberglass batt insulation: Does not dry effectively in place. Wall cavities with saturated fiberglass insulation require removal to allow the framing and sheathing to dry. Budget for replacement insulation.
- Spray foam insulation: Can trap moisture against the framing without showing it on the surface. Moisture meters are essential here.
Environmental factors:
- Ambient humidity: A burst pipe in July in Florida takes longer to dry than the same loss in January in Colorado. High indoor humidity slows evaporation. Industrial dehumidifiers compensate, but in high-humidity climates, more equipment is needed.
- Temperature: Cold slows evaporation. Mitigation crews typically maintain the affected area at 70°F or above during the drying period.
- Building tightness: A well-sealed home traps the humid air displaced by drying equipment; good ventilation or supplemental dehumidification capacity matters.
When it is safe to re-enter and when mold makes it a no-go
Return to the affected areas only when the mitigation company confirms drying targets are met and your local authorities or the restoration crew clear the space. Ready.gov warns explicitly: "Do not enter a flooded area unless you are told that it is safe by authorities."
Mold growth can begin within 24–72 hours of a water intrusion event if conditions are right. Once visible mold or a musty odor is present, the safety calculus changes entirely.
Watch Out: Per Ready.gov, "People with asthma, lung conditions, or immune suppression should not enter buildings with visible or smelled mold growth." If anyone in your household has a respiratory condition, asthma, or immune suppression, they should stay out of the affected areas until professional mold remediation is complete and air quality has been verified — not just until the surfaces look dry.
If you see visible mold or detect a persistent musty smell after drying is complete, stop and call an IICRC-certified mold remediation specialist before any reconstruction begins.
How to choose a reputable water damage restoration company
The right mitigation company can make the difference between a smooth insurance claim and a drawn-out dispute. The wrong one — and there are plenty who show up after storm events or large pipe losses — can under-dry your home, generate inadequate documentation, or pressure you into unnecessary demolition.
The IICRC sets the global professional standard for the restoration industry. Its S500 and related standards define the procedures, monitoring requirements, and documentation practices that legitimate restoration companies follow. Use IICRC's company locator to find firms with credentials in Water Damage Restoration, Structural Drying, Mold Remediation, Mold Remediation Specialist, and Contents Processing.
Vetting checklist before you hire:
- IICRC certification — ask for the company's IICRC firm certification number; individual technicians should also hold current certifications
- 24/7 emergency response — a reputable company dispatches within two to four hours for active water losses
- Written scope of work — before they start, not after
- Daily moisture logs — committed to providing readings throughout the drying process
- Direct insurance billing experience — they should know how to work with adjusters and submit documentation
- References and reviews — look for reviews specifically mentioning insurance claims, not just "they were nice"
- Explains demolition necessity — can tell you specifically why drywall removal is needed and what the moisture readings showed
If you need insurance claim help, ask whether the company regularly coordinates with adjusters and can provide a final report that clearly separates mitigation from reconstruction.
Questions to ask before you sign a mitigation estimate
Get straight answers to these before authorizing work:
- What does this estimate include — extraction, containment, drying equipment, monitoring visits, demolition, and debris removal?
- How many air movers and dehumidifiers will you place, and how will you adjust the equipment count based on readings?
- How often will you check moisture readings, and will you give me a copy of each log?
- Can you provide a final mitigation report formatted for my insurance adjuster?
- Do you bill insurance directly, or do I pay upfront and seek reimbursement?
- If demolition is necessary, who handles the rebuild — you, or a separate contractor?
- What is your process if the drying takes longer than estimated?
A company that can't answer these questions clearly is not the one you want handling a $15,000 insurance-backed mitigation job.
Red flags for storm-chasers and low-quality cleanup crews
After any significant water event, contractors appear fast. Not all of them should be trusted.
Walk away if you see:
- Vague or verbal-only pricing with no written estimate
- Pressure to sign immediately before you've documented the damage or called insurance
- No mention of moisture meters, drying logs, or monitoring visits — just "we'll put fans in and be back in three days"
- No IICRC certification or inability to reference a professional standard
- Demanding full payment upfront before work begins
- Unwillingness to provide a detailed scope of work for your adjuster
- No company address, no verifiable license, and no insurance
- Arriving unsolicited at your door within hours of a publicly known event (door-knockers after a storm are the canonical storm-chaser pattern)
Burst pipe cleanup checklist for what to keep, toss, and document
Start with the assumption that everything wet needs to be evaluated before it is moved, and photographed before it is discarded. The Insurance Information Institute is clear that documentation must precede disposal for a strong claim. If you need insurance claim help, this is one of the most practical places to slow down and keep receipts, photos, and moisture notes together.
Separate items into three categories: salvageable now, professionally remediable, and discard (documented).
What usually can be saved after clean water exposure
Clean water — from a supply line pipe, not a sewer or contaminated source — gives you the best odds of salvage when drying begins within 24 hours.
Commonly salvageable:
- Hard goods: wood furniture if dried quickly and not submerged
- Metal items: pots, appliances, tools — clean and dry thoroughly to prevent rust
- Non-porous surfaces: tile, glass, sealed stone countertops
- Sealed or waterproof containers: canned goods (inspect for label damage), sealed plastic bins
- Electronics that were not submerged and were powered off before water contact — but have them inspected before powering on
- Clothing and textiles that were wet but not contaminated — commercial laundering can save most fabric items
- Photos and documents: can often be air-dried or professionally freeze-dried if caught early
The key variables are water cleanliness (supply line vs drain vs sewage), submersion depth, and how quickly drying began. The faster you act, the more you save.
What usually needs disposal or professional remediation
Some materials cannot be safely dried or decontaminated and should be removed rather than kept.
Typical removal or disposal candidates:
- Wet fiberglass batt insulation — retains moisture, loses R-value, and supports mold growth
- Soaked drywall — when paper facing has saturated or the board has softened, replacement is the standard restoration approach
- Wet particleboard — swells and delaminates; almost never recovers to structural adequacy
- Moldy textiles — mattresses, upholstered furniture, rugs, and curtains with visible mold or persistent odor
- Sewage-contaminated materials — anything touched by Category 3 (black water) should be treated as a biohazard; Ready.gov warns that contaminated water poses serious health risks
- Soaked carpet padding — almost always replaced even when carpet itself is salvageable
- Wet engineered hardwood that has delaminated or shows significant cupping
Photograph every item before removal and note it in your damaged-item inventory. That documentation supports your personal property claim.
Burst pipe insurance claim checklist: deductible, ALE, and next steps
Once your mitigation is underway and your documentation is in order, the insurance process becomes the primary focus. Understanding your deductible, your loss of use coverage, and the claim timeline prevents surprises. This is where insurance claim help is most valuable if you are balancing estimates, adjuster requests, and temporary housing.
Adjuster-ready claim checklist:
- [ ] Claim number obtained from carrier
- [ ] Date and time of loss recorded
- [ ] Photos and video uploaded and backed up
- [ ] Damaged-item inventory started
- [ ] Mitigation company on-site and generating moisture logs
- [ ] Plumber's repair invoice secured
- [ ] ALE applicability confirmed with carrier if displaced
- [ ] Deductible amount confirmed from your policy declarations page
- [ ] Temporary housing receipts saved if applicable
- [ ] Do-not-discard items tagged and photographed
How the deductible works on a burst pipe claim
Your deductible is the amount you pay out of pocket before the insurance policy pays anything. If your deductible is $2,500 and your total covered loss is $18,000, you pay $2,500 and the carrier pays $15,500. If the total loss is $2,200 and your deductible is $2,500, filing a claim nets you nothing — and may affect your premium.
This math matters for mitigation decisions. Emergency extraction and drying by a professional crew commonly runs $3,000 to $8,000 for a moderate loss, and structural repairs add to that. Track your mitigation invoices and repair estimates separately so the adjuster can see the full scope.
Pro Tip: Keep mitigation invoices and repair contractor estimates in separate files. Some adjusters process mitigation and reconstruction as separate line items. Mixed paperwork can delay payment.
What ALE can cover if you cannot live in the house
Additional Living Expenses (ALE), also called loss of use coverage, is the part of your homeowners policy that pays for reasonable extra costs when a covered loss makes your home temporarily uninhabitable. As Travelers explains, ALE can help pay for reasonable housing and living expenses beyond your normal baseline costs.
ALE typically covers:
- Hotel or short-term rental costs above your normal housing cost
- Restaurant meals if your kitchen is unusable (above your normal food spending)
- Laundromat costs if your laundry room is affected
- Pet boarding if the hotel doesn't allow pets
- Extra transportation costs if you're staying farther from work
ALE does not cover your regular mortgage or rent — only the additional cost above your normal budget. Keep all receipts for every expense you intend to claim. Ask your adjuster at the first call whether your situation qualifies for ALE and what documentation they require.
A simple claim timeline from day one to final payment
Day 1: Document damage, shut off water and power as needed, call mitigation company and plumber, notify insurance carrier, get claim number, begin displaced-living receipts if applicable.
Days 1–3: Mitigation crew on-site with equipment. Daily moisture readings logged. Plumber completes pipe repair and issues invoice.
Days 3–7: Adjuster inspection. Provide them your photo documentation, item inventory, receipts, and mitigation logs. Do not discard any damaged items until after this visit. Mitigation continues until drying targets are met.
Days 7–14: Mitigation company issues final drying report and scope-of-work invoice. Get contractor estimates for structural repairs — drywall, flooring, insulation, painting.
Days 14–30: Carrier issues initial claim estimate. Review it against your contractor estimates. If the numbers don't align, this is when you submit supplements with contractor bids and mitigation documentation. ALE payments may begin if the home is uninhabitable.
Days 30–60+: Repairs completed. Final invoices submitted. Carrier issues final settlement. If there's a disagreement, the Insurance Information Institute recommends working through the carrier's dispute process or engaging a public adjuster if the gap is significant.
Drying logs and the mitigation report are the backbone of a strong supplemental claim. If your initial adjuster estimate is low, those documents are what support a revision.
Sources & References
- Ready.gov — Floods — Federal emergency guidance on flood safety, electrical hazards, mold risks, and protective measures during water intrusion
- Insurance Information Institute — Water Damage: What's Covered, What's Not — Confirmation that standard homeowners insurance covers burst pipes
- Insurance Information Institute — Do I Need Flood Insurance? — Explanation of the flood exclusion in standard homeowners policies
- Insurance Information Institute — Settling Insurance Claims After a Disaster — Documentation guidance for adjusters, including item inventory and receipt retention
- Travelers — Does Homeowners Insurance Cover Burst Pipes? — Coverage confirmation for sudden/accidental pipe failures and ALE explanation
- Progressive — Water Pipe Burst — Sudden and accidental coverage framing and neglect exclusion
- State Farm — Winter Prep 101 — Statistic on water release from small pipe cracks
- IICRC S500 Standard for Professional Water Damage Restoration — The professional benchmark for water damage restoration procedures in residential and commercial buildings
- IICRC Standards Overview — ANSI-accredited guidelines governing inspection, cleaning, and restoration work
- IICRC Company Locator — Tool to find certified water damage restoration, structural drying, and mold remediation firms
Keywords: HO-3 homeowners insurance, flood insurance, sudden and accidental water damage, IICRC, water mitigation company, licensed plumber, drywall and insulation removal, dehumidifier, air mover, electrical panel / breaker, ALE (Additional Living Expenses), mitigation documentation, adjuster photos and video, S500 Standard for Professional Water Damage Restoration