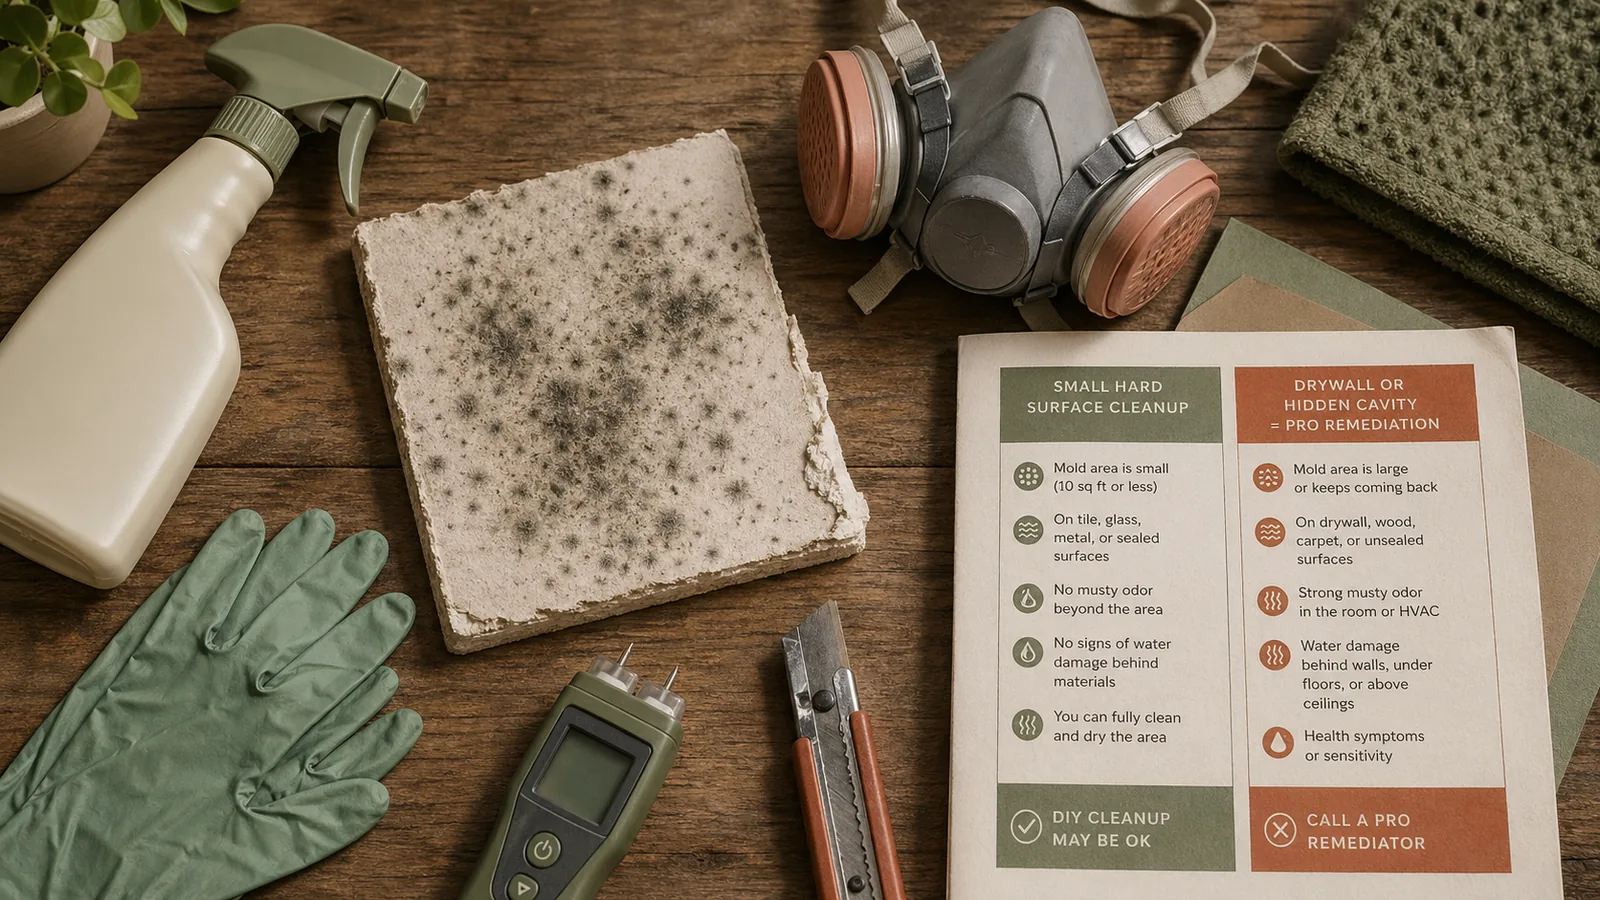
Can you clean mold yourself or do you need a pro?
Whether you can handle mold yourself depends almost entirely on what surface it is growing on and how far it has spread. The EPA draws a clear line: homeowners may clean visible mold on hard, nonporous surfaces when the affected area is small — roughly 10 square feet or less. Think a bathroom tile grout line or the underside of a window sill. Once mold reaches drywall, insulation, ceiling tile, or the inside of a wall cavity, ordinary cleaning is not enough. The CDC is explicit: "Mold remediation requires physical removal of mold rather than disinfecting mold-contaminated surfaces."
Use this fast decision guide before you touch anything:
DIY vs Pro: - Clean it yourself if: the spot is on tile, glass, sealed metal, or sealed hardwood; it is smaller than about 10 square feet; there is no swelling or softness; no porous materials are involved; the water source is fixed; and no one in the household has asthma, lung disease, or a compromised immune system. - Call a mold remediation company if: the mold is on or suspected behind drywall; the drywall is soft, swollen, sagging, or crumbling; insulation is wet or discolored; there is a musty smell you cannot locate; the water source was a sewer backup; mold is visible on or near an HVAC return; the area exceeds 10 square feet; or the moisture problem has happened more than once.
Watch Out: If drywall is swollen, soft, or crumbling, do not clean it in place and do not puncture it. Contamination is almost certainly inside the wall cavity. Opening the wall without proper containment can release concentrated spores into the rest of your home. This is a removal job, not a wipe-down.
What Ready.gov and the EPA say about mold after water damage
Both Ready.gov and the EPA's Brief Guide to Mold, Moisture, and Your Home anchor their guidance on one principle the EPA states directly: "The key to mold control is moisture control." That means the clock starts the moment water hits a surface — not when you notice discoloration a week later.
The EPA says to dry water-damaged areas and items within 24 to 48 hours to prevent mold growth. The CDC reinforces this: clean up and dry your home quickly after flooding — within 24 to 48 hours if possible. If wet materials sit beyond that window, the probability of mold colonizing porous building materials rises sharply, and the scope of professional mold remediation — and its cost — expands with it.
For air quality testing, these same sources support a straightforward triage rule: when mold is already visible or you can smell it, testing should not delay action. The priority is stopping the moisture source, removing or drying affected materials, and containing spores. Air quality testing adds the most value after remediation is complete — as a clearance check before repairs start — or when there is a disputed hidden moisture problem.
Why the first 24 to 48 hours matter
Mold spores exist everywhere; they only need moisture and a food source to colonize. The EPA states clearly: "In most cases, mold will not grow if wet or damp items are dried within 24–48 hours." Miss that window and you shift from a drying problem to a remediation problem.
Here is what that timeline looks like in practice:
| Timeframe | Action Required |
|---|---|
| 0–2 hours | Stop the water source. Move undamaged valuables. Take date-stamped photos. |
| 2–12 hours | Extract standing water. Open windows if outdoor humidity is low. Run fans on wet surfaces and subfloor. |
| 12–24 hours | Deploy a dehumidifier rated for the room size. Assess drywall and insulation for saturation — probe with a moisture meter if you have one. |
| 24–48 hours | Decide: materials that cannot be confirmed dry should be removed now, not watched for another week. If drywall is still wet at 48 hours, call a professional. |
Waiting to "see if it dries out" past 48 hours is the single most common mistake homeowners make after a leak. It rarely saves money and often doubles the scope of the eventual remediation job.
Who should stay out of the area completely
Ready.gov is unambiguous on this point: people with asthma, other lung conditions, or immune suppression should not enter buildings with indoor water leaks or mold growth that can be seen or smelled.
Watch Out: This is a hard rule, not a general caution. If anyone in your household has asthma, COPD, cancer-related immune suppression, is undergoing chemotherapy, or has any condition that affects lung function, they should stay out of — and ideally away from — the structure until a professional has assessed and cleared the area. That person should not be the one doing cleanup, and they should not be present while cleanup happens.
If you are the only adult and you have one of these conditions, call a certified mold remediation company rather than doing any cleanup yourself. The short-term savings are not worth the respiratory exposure.
What mold can be cleaned and what should be thrown away
The gap most online guides skip is the specific line between "wipe it down" and "bag it and throw it out." Here it is, plainly: surface equals cleanable, porous equals removable.
The EPA and CDC guidance supports this division directly. The CDC's core instruction for wetted materials is to dry them within 48 hours — or remove them. There is no third option of "clean them in place and leave them wet." As the CDC states, "Drying wetted materials within 48 hours of getting wet or remove the materials."
Clean vs. Discard Decision Table
| Material | Mold Visible? | Decision | Notes |
|---|---|---|---|
| Ceramic tile, glass, metal | Yes, surface only | Clean | Detergent + water, dry completely |
| Sealed hardwood floor | Yes, surface only | Clean with caution | Unsealed wood absorbs — inspect underneath |
| Drywall (gypsum board) | Any visible growth | Remove | Porous core holds contamination; do not clean in place |
| Fiberglass batt insulation | Wet or discolored | Remove | Cannot be reliably cleaned or dried |
| Rigid foam insulation | Surface only, small | Clean if nonporous facing; remove if saturated | Assess honestly |
| Ceiling tile (acoustical) | Any visible growth | Remove | Porous and typically unsalvageable |
| Carpet padding | Wet or moldy | Remove | Holds contamination well below surface |
| Wall cavity contents | Suspected contamination | Professional assessment | Do not open without containment |
The practical reason for this table: mold remediation is not about killing surface spores with bleach. Porous materials hold contamination deeper than any surface cleaning method reaches — the mycelium (the root structure of the mold) penetrates into the material itself.
Nonporous surfaces you can usually clean
Hard, nonporous surfaces — ceramic tile, glass, stainless steel, sealed metal, glazed brick — do not absorb moisture the way drywall and insulation do. Mold on these surfaces stays at the surface, which is why EPA guidance supports homeowner cleanup on small areas of this type.
The EPA's mold cleanup guidance is clear that the threshold for DIY cleanup is about 10 square feet. A shower wall with grout haze, a bathroom windowsill with surface spots, a basement utility sink with black residue around the drain — these are reasonable DIY jobs if the total affected area stays under that limit and there is no drywall involvement.
Sealed hardwood sits in a gray zone. If the finish is intact and the mold is only on the surface, cleaning is a reasonable first step. If the finish is compromised, water has sat on the wood for more than 48 hours, or the wood feels soft, treat it as porous and get a professional opinion before sanding or stripping.
Porous materials that usually need removal
Drywall, fiberglass insulation, acoustical ceiling tile, and carpet padding share one characteristic: they absorb water and hold it in a matrix that surface cleaning cannot reach. As the CDC states plainly, "Mold remediation requires physical removal of mold rather than disinfecting mold-contaminated surfaces." That quote was written specifically for mold-contaminated materials — not just for large commercial jobs.
Discard list for most residential mold scenarios: - Drywall with any visible mold growth or that has been wet for more than 48 hours - Fiberglass batt insulation that is wet, compressed, or discolored - Acoustical ceiling tiles with any visible staining or growth - Carpet padding under wet carpet - Cardboard boxes, paper, or books that are saturated and moldy - Particleboard or MDF furniture that has swollen or discolored
For drywall repair, the sequence is: containment first, remove contaminated wallboard, verify the cavity is dry and clean, then patch and replace. Skipping straight to patching over wet or moldy drywall is one of the most common callbacks a restoration company fields — the problem returns within months.
When swollen, soft, or crumbly drywall is a no-touch sign
Watch Out — Do Not Touch This Drywall: If the drywall surface is bubbling, sagging away from the studs, soft when you press it gently, or if the paper facing is separating and crumbling at the edges, stop. Do not clean it. Do not poke it. Do not cut into it without a containment barrier in place.
Swollen drywall means water has saturated the gypsum core. At that point, mold growth inside the wall cavity — between the drywall and the insulation, or in the insulation and framing — is likely even if you cannot see it from the room side. Opening saturated drywall without plastic sheeting containment and a negative-pressure setup releases whatever is growing inside directly into your living space.
What to look for: paint that is bubbling or lifting in sheets; edges where the drywall meets trim that are soft and slightly darker; visible sagging of a wall or ceiling section; a persistent musty smell in a room where you cannot see any mold. Any of these signs means the wall cavity should be assessed — and, if contamination is found, remediated — before any drywall repair begins.
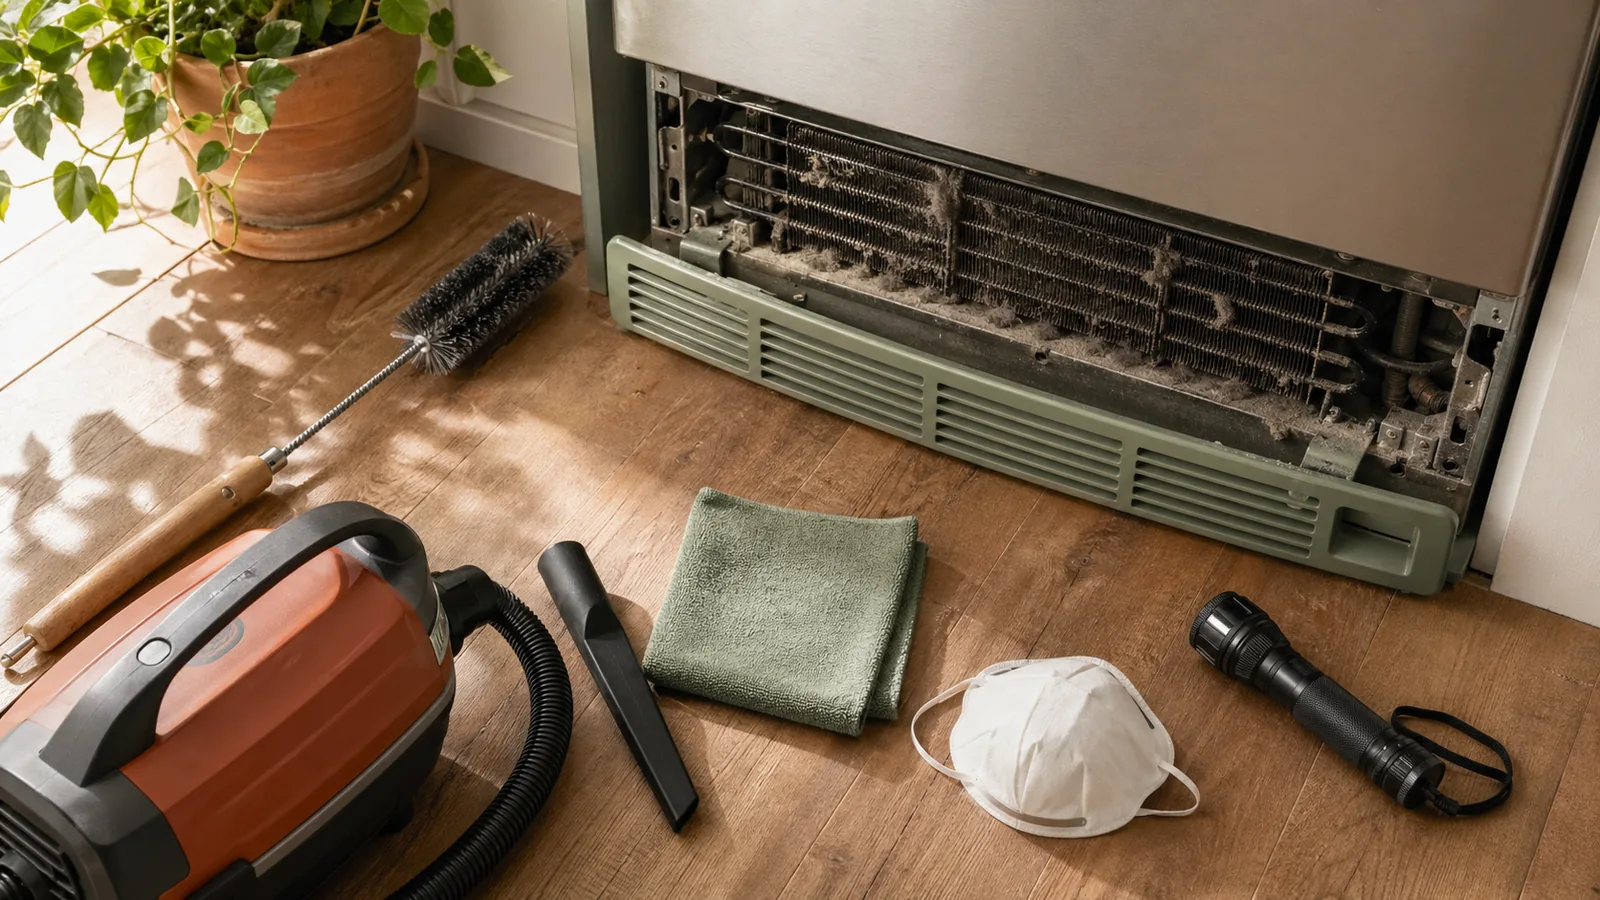
How to clean small mold spots safely
For confirmed small-area mold on a nonporous surface — under 10 square feet, no drywall involvement, water source already fixed — here is the sequence:
- Fix the moisture source first. Cleaning without stopping the water is futile. The EPA says it directly: "The key to mold control is moisture control." Repair the leak, seal the gap, or fix the condensation problem before any cleaning begins.
- Set up the work area (see containment section below).
- Put on your PPE (see PPE section below).
- Scrub with detergent and water. Soap and water is the primary cleaner for surface mold on nonporous materials. Work in sections and rinse with clean water.
- Dry the surface completely. Use fans and a dehumidifier. The surface must be dry — not just visually clean — before you finish. Damp surfaces allow regrowth.
- Bag and seal contaminated materials. Any sponges, rags, or disposable scrubbers used during cleaning go directly into a heavy-duty plastic bag, sealed, and out to the trash. Do not reuse cleaning materials.
- Verify the moisture source is gone. If the spot returns within weeks, the water problem was not fixed. Call a plumber and then reassess whether professional mold remediation is needed.
PPE homeowners should wear before cleaning mold
Skipping personal protective equipment during even a small cleanup means breathing and touching airborne spores directly. Use all three layers:
- Gloves: Nitrile or rubber, long enough to cover your wrists. Do not use thin latex exam gloves if you are also using a bleach-based cleaner.
- Eye protection: Safety glasses or goggles that seal around the eye. Regular eyeglasses do not protect against splash or airborne particles.
- Respirator: At minimum, an N95 disposable respirator. The CDC NIOSH guidance on N95 respirators emphasizes that proper fit and filtration both matter — an N95 worn loosely around your nose provides essentially no protection. If you have a beard or facial hair that prevents a good seal, use a half-face respirator with P100 filters instead.
For larger cleanup jobs approaching the 10-square-foot limit, step up to a half-face respirator with N100 or P100 cartridges. Save the N95 for the small-spot jobs it was designed for.
How to contain the area so spores do not spread
Containment is what separates a successful cleanup from one that spreads the problem into other rooms. The CDC is direct: "Plastic sheeting or bags can be used to contain these items to minimize dispersion of mold spores during removal."
Containment checklist for small DIY cleanup:
- Close all doors between the work area and the rest of the house before starting
- Cover HVAC supply vents in the work area with plastic sheeting and painter's tape to prevent spores from entering the duct system
- If the cleanup area is tied to a return air grille or visible duct opening, stop and get a professional assessment before you begin
- Use heavy-weight plastic sheeting (6-mil minimum) to cover doorways if the room does not have a door
- If you can manage airflow safely, move air out of the room toward a window opening so disturbed dust is less likely to drift into adjoining spaces
- After cleanup, bag all materials and exit the contained area before removing PPE
If your HVAC return is in the same room as the mold — or if you find mold on or near the return grille itself — stop the DIY cleanup entirely. This is a professional job (see the HVAC section below).
What to use and what not to mix
Plain detergent and water is the EPA-supported first choice for cleaning surface mold on nonporous materials. You do not need specialty "mold killer" sprays for basic surface cleanup — mechanical scrubbing and complete drying are more effective than any spray-and-leave product.
Watch Out: Never mix bleach with ammonia or with any cleaner that contains ammonia. The CDC cautions that mixing bleach with other cleaners can create hazardous gases and irritating fumes, so read every label before combining products. When in doubt, use only plain detergent and water.
When mold remediation is mandatory
Some conditions put a job squarely beyond DIY, regardless of the visible surface area. The EPA's 10-square-foot threshold only applies to small surface mold on nonporous materials — it is not a universal pass for all mold under that size. The CDC says remediation should follow "appropriate remediation guidelines with proper containment when identifying mold on materials." When the conditions below apply, proper containment is beyond what most homeowners can set up safely.
When to Call a Pro — Mold Remediation is Required: - Mold is on or inside drywall, insulation, or ceiling tiles - Drywall is soft, swollen, sagging, or crumbling - There is a musty smell but you cannot find visible growth (hidden wall contamination) - The water source was a sewer backup, toilet overflow, or flooded drain - Mold is visible on or near an HVAC return grille or inside ductwork - The affected area is larger than about 10 square feet - Moisture has returned to the same location more than once - The building is a rental and you are responsible for habitability - Anyone in the household has asthma, lung disease, or immune suppression
Professional mold remediation at this level involves licensed contractors using commercial HEPA air scrubbers, full negative-pressure containment with 6-mil poly barriers, commercial-grade dehumidifiers, and moisture mapping before and after the job. This is not a service you can replicate with a rented machine and plastic from the hardware store.
Hidden wall cavities and insulation contamination
Mold inside a wall cavity is categorically different from surface mold on a tile. You cannot clean what you cannot reach. As the CDC states, "Mold remediation requires physical removal of mold rather than disinfecting mold-contaminated surfaces" — and hidden contamination inside a wall is the clearest example of why surface cleaning fails.
The professional approach: the contractor builds a full poly containment chamber around the work area, establishes negative air pressure using a HEPA air scrubber exhausting to the exterior, then opens the wall to assess the cavity. Contaminated drywall is cut back past the visible growth margin — typically at least 12 inches beyond any staining. Fiberglass insulation is removed entirely from the affected bay. Framing that is contaminated is treated or, in severe cases, replaced. The cavity is then dried, treated, and inspected before any new insulation or drywall repair begins.
Attempting to open a contaminated wall without this containment setup is how a localized wall problem becomes a whole-house air quality problem.
Sewer backup or contaminated water means different rules
Sewer backup is not the same as a clean-water leak from a supply line. Sewage-contaminated water — sometimes called Category 3 water in restoration industry terminology — carries pathogens and biological hazards well beyond mold. Any porous material that has contacted sewage-contaminated water generally requires professional remediation and removal. This includes carpet, padding, drywall, insulation, and in some cases hardwood flooring.
Do not attempt to clean up after a sewer backup yourself beyond emergency protective measures (turning off the water, avoiding contact, ventilating). The mold remediation scope for a sewage event requires contractors trained in biohazard handling, not just mold cleanup. Contact a certified restoration company and document everything before any cleanup begins — you will need that documentation for your insurance claim.
Why a moldy HVAC return is a red flag
The return air path is where your HVAC system pulls air from every room in the house back to the air handler. If mold establishes on or near a return grille, inside the return plenum, or on the filter housing, the air system can move contaminated air through connected ductwork and into other parts of the home.
If you see discoloration, fuzzy growth, or a persistent musty smell when the system runs, arrange for the HVAC system to be inspected and do not keep operating it until a professional has evaluated the return, the air handler, and the accessible ductwork. A qualified HVAC technician or a mold remediation company with duct-cleaning capabilities should assess whether the contamination requires duct cleaning, component replacement, or both. Running a contaminated system while debating next steps is the fastest way to spread the problem into areas that were previously unaffected.
Should you test air for mold or rely on what you can see and smell?
When mold is visible or you can smell it clearly, air quality testing should not delay your response. The EPA says to fix the water problem and clean up mold promptly — visible growth and persistent odor are already sufficient evidence that action is needed. Ordering a $400 air test while wet drywall sits in your wall cavity for another week only increases the remediation scope.
[Image: Decision flowchart — air testing vs. immediate remediation action]
The decision tree is simple:
- See mold or smell mold?
- Yes → Act now. Fix the moisture source, contain the area, and start removal or drying immediately.
- No → Go to the next question.
- Is the question about whether the cleanup is complete?
- Yes → Use air quality testing as a clearance check after remediation.
- No → Go to the next question.
- Is there a persistent musty odor after drying and visible cleanup?
- Yes → Bring in a professional moisture inspection and consider targeted testing for hidden contamination.
- No → Testing is usually less useful than a direct inspection.
- Is this a medical exposure concern?
- Yes → Talk to a physician; testing does not answer that question.
When testing helps after cleanup or before repairs
Post-remediation verification testing is the most defensible use of air quality testing in a residential mold situation. After a professional remediation company completes their work, an independent industrial hygienist (a specialist separate from the remediation contractor) takes air samples and compares spore counts inside the remediated space to outdoor baseline levels. If the post-remediation sample shows elevated counts, additional work is needed before reconstruction begins. Many insurance carriers and buyers in a subsequent home sale will want this clearance documentation.
Testing also adds value in two other specific scenarios: when there is a persistent musty odor after the source has been dried and appears clean (suggesting hidden colonization the remediation may not have reached), and when there is a genuine dispute between a homeowner and a contractor about whether contamination is present in a specific area.
When testing is less useful than calling a remediator
If drywall is swollen, if you can see black or green growth on building materials, or if wet porous materials have been sitting for more than 48 hours, testing should not be the first call you make. The CDC and EPA guidance is consistent on this: visible growth and wet porous materials already justify removal, containment, and drying decisions. A test result will tell you what species of mold is present — it will not tell you whether to act, because you already know you need to act.
Testing in this scenario also carries a practical risk: mold spore counts in air samples fluctuate based on airflow, humidity, and recent disturbance. A "clean" air test result does not mean the wall cavity is clean. Remediators regularly find extensive hidden growth after air tests come back with only modestly elevated counts. Use your eyes and nose first; use air sampling to verify after the work is done.
How much mold remediation costs and what changes the price
Mold remediation costs vary widely based on the size of the affected area, what materials need to be removed, how much structural drying and reconstruction is required, and your geographic market. Because pricing is highly local and depends on scope, the safest planning move is to get a written estimate after a moisture inspection rather than rely on a generic online number.
Cost Snapshot: For mold remediation, request an itemized quote that separates containment, demolition, drying, clearance testing, and reconstruction. The final price changes with room size, material type, hidden damage, and whether HVAC cleaning or rebuild work is needed.
What drives costs from scope to scope
The difference between a small contained job and a large structural one is almost always scope — how much material needs to come out and how long the structure needs to be dried and monitored before reconstruction can begin.
Typical line items in a remediation estimate:
| Line item | What it covers | Why it changes |
|---|---|---|
| Containment setup | Poly barriers, zipper doors, negative-air machine rental/operation | Larger rooms and hallway access increase labor and materials |
| Labor | Demolition, material removal, bagging, disposal | More hidden damage means more tear-out |
| Disposal fees | Contaminated drywall and insulation disposal | Haul-away and tipping rules vary by jurisdiction |
| Commercial dehumidification and air scrubbing | Daily rental plus monitoring | Saturated structures need more drying time |
| Drywall replacement | Material and labor for reconstruction | Separate trades and room complexity affect price |
| Clearance testing | Post-remediation air samples by an independent industrial hygienist | Documentation requirements vary by buyer or insurer |
| HVAC cleaning | If ductwork is involved | Access, contamination level, and system size all matter |
When drywall repair is part of the bill
Drywall repair is almost always a separate phase — and often a separate contractor — from the remediation itself. Remediation ends when the contaminated material is out, the structure is dry, and clearance testing confirms acceptable spore levels. Reconstruction begins after that milestone.
A typical reconstruction sequence after remediation: insulation installation, new drywall hung and screwed, seams taped, two to three coats of joint compound (mud), sanding, priming, and painting. In rooms where drywall was removed to the studs across a large area, this adds time and labor beyond the remediation phase. Factor this into your total budget early — the remediation company's quote covers the demolition and drying, but the wall does not put itself back together.
How to choose a reputable mold remediation company
After a flood or water loss, contractors appear quickly and not all of them are qualified. The benchmark for professional mold remediation standards in the US is the IICRC S520. As the IICRC describes it, "The IICRC S520 Standard describes the procedures to be followed and the precautions to be taken when performing mold remediation in residential, commercial, and institutional buildings, and the systems and personal property contents of those structures." IICRC standards are ANSI-accredited, meaning they represent consensus best practices for the industry.
A contractor who cannot describe their process in terms consistent with S520 — containment, source control, physical removal, drying verification, clearance testing — should not be doing the work in your home.
Vetting checklist:
- Ask for IICRC certification documentation. The technician on-site should hold an Applied Microbial Remediation Technician (AMRT) or equivalent credential.
- Request a written scope of work before signing. The scope should name what will be contained, what will be removed, how the area will be dried, and what clearance verification method will be used.
- Ask for a moisture map — a documented baseline of where moisture was found before work starts.
- Request proof of liability insurance and confirm the policy covers mold remediation work specifically.
- Ask for references from jobs completed in the past 12 months. Call them.
- Confirm the estimate is in writing and itemized. Verbal estimates have no value when a dispute arises.
Questions to ask before you sign a remediation estimate
Put these questions to every contractor before signing:
- How did you identify the moisture source, and has it been stopped?
- What containment will you build, and how will you maintain negative air pressure?
- What exactly will be removed versus cleaned in place? Why?
- How will you dry the structure, and how will you measure when it is dry enough?
- Do you provide clearance verification after the work, or do you recommend an independent industrial hygienist for that step?
- Is reconstruction included in this estimate, or is that a separate contract?
- Have you worked with my insurance carrier before, and can you provide a format-compliant estimate for the adjuster?
If a contractor is evasive, dismissive, or cannot answer questions 1 through 5 specifically, that is your answer.
How to spot storm-chasers and vague scopes
After any large weather event, unlicensed or out-of-state contractors move into affected areas quickly. Not all of them are bad actors, but some specific behaviors are consistent red flags:
- Pressure to sign immediately — "I have a crew available today but only today"
- Cash-only payment demands or unusually large upfront deposits (more than 10–15% before work starts)
- No written scope or itemized estimate — a vague "mold remediation, all inclusive" line item
- No moisture mapping — a contractor who does not document where the moisture was before they start cannot prove they fixed the problem
- No IICRC credentials when asked directly
- Out-of-state license plates on every truck with no local office or registered local entity
- Requests to sign an Assignment of Benefits (AOB) form before work begins — this transfers your insurance claim rights to the contractor, which removes your ability to dispute the work or negotiate with your carrier
Will homeowners insurance cover mold and water damage?
The short answer, per the National Association of Insurance Commissioners (NAIC): "Mold — homeowners policies often exclude covering the cost of damage from mold." This is one of the most consistently misunderstood aspects of homeowners coverage.
Under a standard HO-3 homeowners insurance policy, coverage for water damage depends heavily on the cause of the loss. Sudden and accidental water damage — a pipe bursting inside the wall, a water heater rupturing, an appliance hose failing — is generally a covered peril. Gradual moisture damage, long-term seepage, or damage that a reasonable inspection would have revealed before it became severe is generally not covered. Mold that results from a covered water loss may be partially covered, but many policies cap mold-related remediation at a sub-limit without stating a consistent national dollar figure.
Flood damage from an external source — groundwater rising, overflowing streams, storm surge — is not covered by standard homeowners insurance. As the CFPB states: "Standard homeowner's insurance doesn't cover damage from earthquakes or floods, but it may be possible to add this coverage." Flood coverage requires a separate NFIP policy or private flood endorsement.
Call your carrier's claims line the same day as the loss, not after you have started cleanup. Early notification protects your coverage rights.
What to document in the first hour after a leak
Your insurance claim lives or dies on documentation. Do this before touching anything:
- Date-stamped photos and video — shoot the source of the water, every affected surface, all wet materials, and any visible mold growth. Include a wide shot showing the room context, then close-ups of damage.
- Photograph all affected contents — furniture, electronics, clothing, stored items. Open closet doors and shoot what is inside.
- Document the water source — a photo of the burst pipe, the failed appliance, the cracked supply line. If a plumber makes a repair, get a written receipt with the cause of failure noted.
- Keep all mitigation receipts — if you rent fans, buy a dehumidifier, or hire an emergency drying company before the adjuster arrives, save every receipt. These are part of your claim.
- Write down the date and time you first discovered the damage. Insurance adjusters will ask.
- Do not throw anything away until the adjuster has documented it, or until you have photographed it thoroughly and confirmed with your carrier that disposal is acceptable.
When ALE may pay for temporary housing
ALE coverage — Additional Living Expenses — is the part of your HO-3 policy that reimburses you for the increased cost of living somewhere else while your home is being repaired after a covered loss. ALE typically covers:
- Hotel or short-term rental costs above what you normally spend on housing
- Meals if your kitchen is unusable (typically reimbursed at amounts above your normal grocery spend)
- Laundry, storage, and pet boarding if those costs arise directly from the displacement
- Temporary moving and storage of salvageable contents
ALE kicks in when a covered loss makes the home genuinely uninhabitable — not merely inconvenient. Extensive mold remediation that requires you to vacate during containment and demolition is often a qualifying event if the underlying water loss was covered. Confirm the trigger with your adjuster immediately when the loss is reported. Keep receipts for every displaced-living expense — ALE reimbursement is a documented-expense reimbursement, not a flat cash payment.
FAQ: common mold cleanup questions homeowners ask
Can I clean mold myself on drywall?
No, not as a standard surface-cleaning job. The EPA permits DIY cleanup on hard, nonporous surfaces under about 10 square feet. Drywall is porous — it absorbs moisture and allows mold to grow inside the gypsum core and paper facing, well beyond what any surface scrubbing reaches. The CDC is explicit that mold remediation requires physical removal of contaminated materials, not disinfecting them in place. If your drywall has any mold growth, is soft, swollen, or has been wet for more than 48 hours, the correct action is removal under containment — not cleaning.
When should you call a professional for mold?
Call a certified mold remediation company when: the affected area is larger than about 10 square feet; any drywall, insulation, or ceiling tile is involved; the drywall is soft, sagging, or swollen; there is a musty smell without obvious visible growth; the water source was sewage-contaminated; mold is at or near an HVAC return; moisture has returned to the same area more than once; or anyone in the household has asthma, lung disease, or immune suppression. Per Ready.gov, those individuals should not enter areas with visible or smelled mold growth at all.
Should you test air for mold or just go by what you can see and smell?
When growth is visible or you can clearly smell mold, do not let testing delay action — the EPA guidance says fix the water problem and clean up promptly. Air quality testing is most useful for post-remediation clearance verification (confirming the job is complete before drywall goes back up), or for investigating persistent odors after visible contamination has been removed. A test result does not replace a remediation decision when the evidence is already in front of you.
How much does mold remediation cost?
Costs vary by the amount of material removed, drying time, and whether reconstruction is included. Ask for a written itemized estimate that separates containment, demolition, drying, clearance testing, and rebuild work. A small bathroom wall will not cost the same as a hidden wall cavity or a multi-room flood job, so compare bids only after every contractor has inspected the same space. Get at least three written, itemized estimates from IICRC-certified contractors before committing.
Is mold from a water leak covered by homeowners insurance?
Sometimes — and the details matter. The NAIC notes that homeowners policies often exclude mold damage costs. Whether a mold-related claim is covered under your HO-3 policy depends on whether the underlying water loss was a sudden and accidental covered peril. Gradual seepage and flood-sourced water are generally not covered without separate endorsements. Many policies that do cover mold cap the remediation benefit at a sub-limit without publishing a single nationwide number. Call your carrier the same day as the loss, document everything before cleanup starts, and ask your adjuster specifically about mold limits and ALE eligibility.
Sources & References
- Ready.gov — Floods — Federal guidance on flood cleanup safety including health risk warnings for vulnerable populations
- EPA — Mold Cleanup in Your Home — EPA guidance on DIY cleanup thresholds and porous versus nonporous surface rules
- EPA — A Brief Guide to Mold, Moisture, and Your Home — Core EPA framework on moisture control and mold prevention
- EPA — Mold Course Chapter 4 — 24–48 hour drying window guidance and mold growth conditions
- CDC NIOSH — Mold Testing and Remediation — CDC guidance on remediation standards including the 48-hour drying or removal rule
- CDC — Reopening Health Facilities (Archived) — CDC source for physical removal requirement and plastic sheeting containment guidance
- CDC — Epic Newsletter on Flood Cleanup — 24–48 hour cleanup guidance after flooding
- CDC NIOSH — N95 Respirator Day — N95 fit and filtration guidance
- CDC NIOSH — Protect Yourself When Using Bleach and Other Cleaning Products — Bleach mixing and fumes safety guidance
- IICRC S520 Standard for Mold Remediation — Industry standard for residential and commercial mold remediation procedures
- IICRC Standards Overview — ANSI-accredited restoration and cleaning standards
- NAIC — Homeowners Insurance Consumer Guide — NAIC guidance on mold exclusions in standard homeowners policies
- CFPB — What is Homeowners Insurance? — CFPB explanation of standard HO-3 coverage and flood exclusions
Keywords: EPA Mold Cleanup in Your Home, CDC mold cleanup guidance, Ready.gov floods, IICRC S520, IICRC certification, drywall, fiberglass insulation, wall cavity, PPE respirator N95, plastic sheeting containment, HEPA air scrubber, HVAC return, sewage contamination, HO-3 homeowners insurance, ALE coverage