The kitchen work triangle is not a design trend — it is a functional standard backed by the National Kitchen and Bath Association (NKBA), the certification body that sets the ergonomic benchmarks professional designers use every day. Yes, open-concept kitchens have changed how we live in the kitchen, but they haven't made the triangle obsolete. If anything, they've made understanding it more important, because without a deliberate layout, an open floor plan can turn your cooking path into a household thoroughfare. For homeowners comparing layout changes with home improvement services, the triangle is still the first measuring stick to use before any cabinets move.
What the kitchen work triangle is and why it still matters
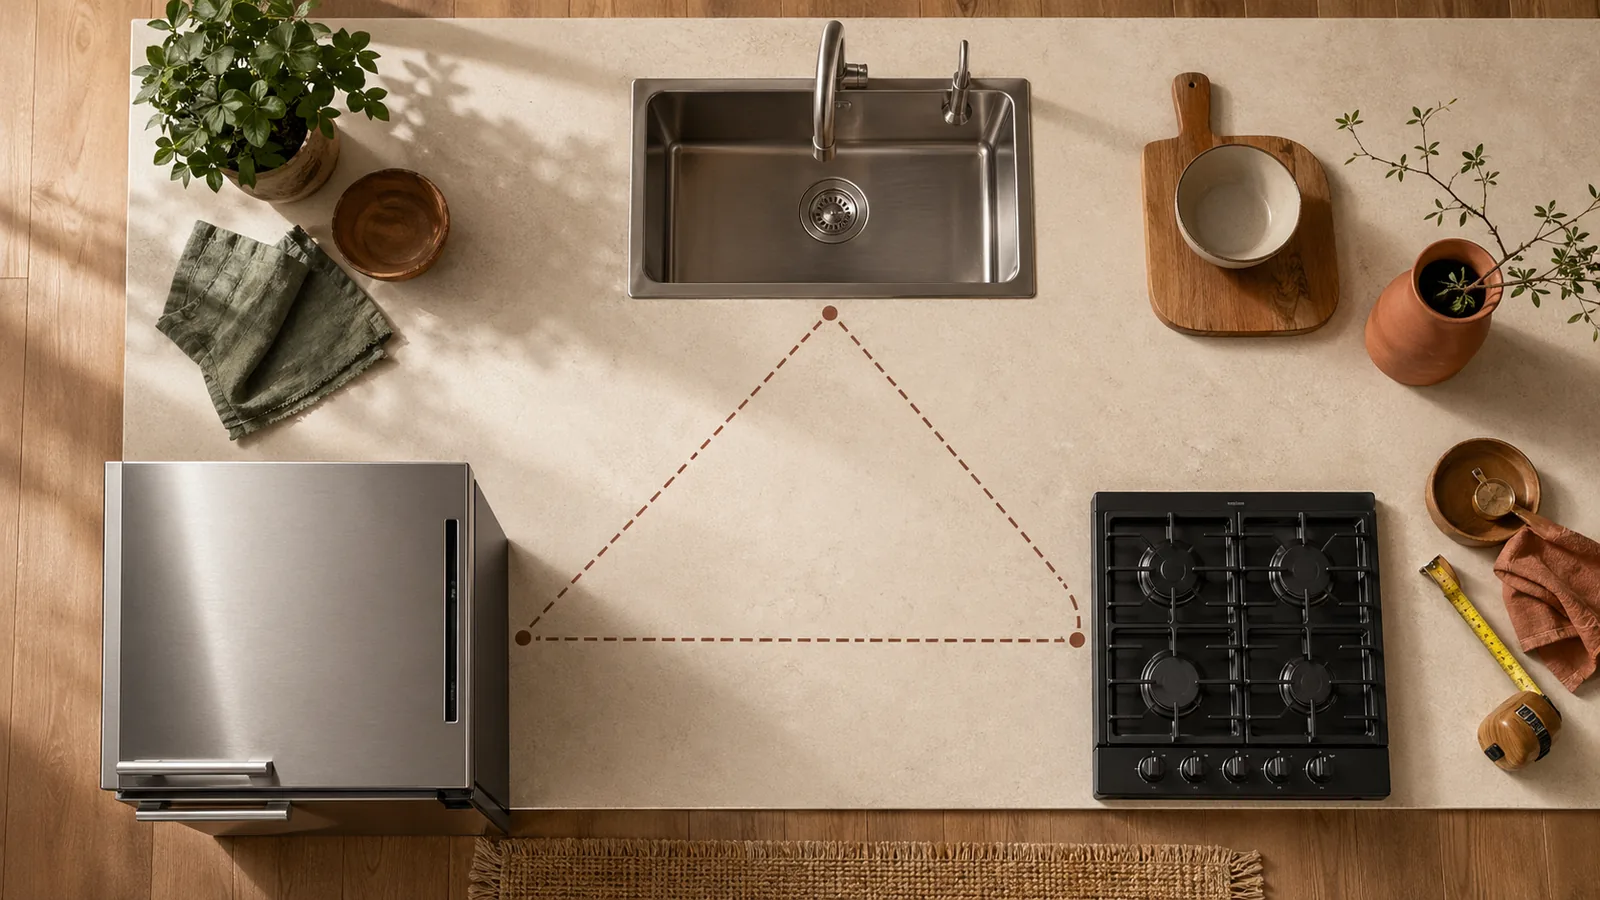
The kitchen work triangle defines the path between the three most-used work centers in any kitchen: the sink, the refrigerator, and the range. The concept exists because cooking involves constant back-and-forth between those three points — you pull food from the fridge, rinse it at the sink, and cook it at the range. Minimizing those steps reduces fatigue and speeds up meal prep.
Per the NKBA Kitchen Planning Guidelines, the sum of all three sides of the work triangle must fall between 13 and 26 feet, and each individual leg must measure no less than 4 feet and no more than 9 feet. Too small and you're cramped; too large and you're logging unnecessary steps every time you cook dinner.
NKBA describes these guidelines as an "essential reference" for kitchen and bath design professionals. For homeowners considering home improvement services, they're the most reliable measuring stick available — more grounded than a designer's aesthetic opinion and more specific than anything you'll find in a typical home improvement blog. If you're planning a kitchen update or working with a home improvement professional on a layout change, use those numbers as your non-negotiable baseline.
[Image: Work triangle diagram — Sink, Fridge, and Range labeled at each corner of a triangle with leg measurements annotated]
Sink, fridge, and range: the three points of the triangle
Per NKBA's planning materials, the three core work centers are the cooktop or range, the refrigerator, and the sink. Each one represents a distinct task: refrigeration (storage and cold prep), the sink (washing, rinsing, and water access), and the range (cooking and heat).
The triangle works because these three tasks happen in sequence constantly. A well-positioned triangle means you're never walking more than 9 feet between any two of them, and the total loop stays under 26 feet. That matters on a Tuesday night when you're making dinner while watching a kid's soccer bag land on the kitchen floor — efficiency reduces the friction that turns cooking into a chore.
Pro Tip: Label your actual sink, fridge, and range on a rough floor sketch before any planning conversation with a contractor. Measure the three distances and add them up. If they exceed 26 feet, you've just identified why your kitchen feels exhausting to cook in.
NKBA triangle measurements homeowners should know
The NKBA's 4-to-9-foot leg rule and 26-foot total limit aren't arbitrary. They reflect decades of ergonomic research and real-world kitchen observation. Here's what each threshold means in practice:
- Under 4 feet per leg: You don't have enough room to stand at one appliance without bumping into the adjacent one. Open the fridge and the door swings into your prep zone.
- Over 9 feet per leg: Each trip between stations becomes a full walk across the kitchen. Multiply that by 30 round-trips during dinner prep and you understand why oversized triangles are exhausting.
- Over 26 feet total: Your kitchen layout is fighting your workflow. The triangle's efficiency payoff disappears entirely above this threshold.
These are NKBA recommendations, not building code minimums — your municipality won't fail an inspection if your triangle is 28 feet. But any kitchen designer or remodeling consultant worth hiring will use these numbers to evaluate whether your proposed layout actually works.
Watch Out: Many galley and L-shaped kitchens feel tight but actually comply with the triangle guidelines. Measure before you assume the layout is broken — a well-proportioned galley can outperform a poorly planned open kitchen.
Why modern open-concept kitchens need secondary zones
The work triangle solves the cooking problem. It does not solve the 2026 kitchen problem, which is that open-concept homes have turned the kitchen into a multi-purpose hub. Kids use the fridge for snacks during homework. A partner pulls a coffee mug while you're searing proteins. Guests linger at the island while you're plating. Without secondary zones, all of that traffic routes directly through your primary cooking path, and home improvement services often have to correct exactly that routing mistake after the fact.
The NKBA guidelines address this directly: the recommended work aisle — the clear floor space running through the active cooking area — should be at least 42 inches wide for a single cook and at least 48 inches for multiple cooks. When secondary appliances and social traffic share that aisle with the cook, even a compliant 42-inch clearance becomes a bottleneck.
Secondary zones fix this by pulling beverage, baking, and cleanup tasks out of the primary triangle entirely. The triangle handles the cooking workflow; zones handle everything else. A household where one person cooks and three others circulate can function smoothly — but only if the layout deliberately routes non-cooking traffic away from the triangle's 42-inch corridor.
Pro Tip: In an open-concept layout, position secondary zones on the perimeter walls or at an island end farthest from the range. Anyone heading to the coffee station or the snack fridge should never have to pass between the range and the sink.
How kitchen zoning differs from the work triangle
The work triangle is a three-point efficiency circuit. Kitchen zoning is a task-assignment strategy — it parcels the kitchen into activity areas based on what people actually do there, which in a modern home is far more than cook dinner.
| Feature | Work Triangle | Zone Layout |
|---|---|---|
| Focus | Three core appliances | Multiple task areas |
| Purpose | Minimize cooking travel | Separate activity types |
| Replaces the other? | No | No |
| Best used | Always as the baseline | Layered on top of the triangle |
The triangle tells you where the sink, fridge, and range need to land. Zones tell you where to put everything else — the espresso machine, the stand mixer, the dish rack, the recycling bin. They complement each other. A kitchen designed only around the triangle often has no clear home for secondary appliances, so they migrate onto triangle counter space and create exactly the congestion zones are meant to prevent.
Where secondary appliances belong in an open floor plan
Secondary appliances — beverage fridges, microwave drawers, wall ovens, toaster ovens — should move out of the primary triangle whenever your floor plan allows it. Keeping them inside the triangle forces non-cooking family members into the cook's active path every time they want to reheat something.
Here's a practical placement guide:
- Microwave drawer or wall oven: Mount these outside the sink-fridge-range circuit, ideally near the prep zone or cleanup zone depending on how you use them most. GE Profile makes microwave drawers and wall ovens that integrate cleanly into base-cabinet or upper-cabinet runs, keeping them accessible without landing in the triangle.
- Beverage fridge: An undercounter unit at the end of an island or on a perimeter wall away from the range. Bosch undercounter refrigerators in the 300 and 500 Series are a common choice for this placement and sized to fit standard 24-inch cabinet cutouts.
- Toaster oven / countertop convection oven: Belongs on the prep zone counter, not next to the range. KitchenAid makes countertop convection units that work well here and match appliance finishes if you're already in that ecosystem.
Watch Out: A microwave placed directly above a range forces whoever is reheating leftovers to stand right behind whoever is cooking. Even if the triangle dimensions are perfect, this one placement error creates daily conflict.
Coffee and beverage station layout ideas for busy households
A beverage zone is the single highest-return zone addition for households where more than one person starts the morning in the kitchen. Positioned away from the triangle — typically on a short perimeter wall, a dedicated island section, or an alcove — it keeps coffee, tea, and water traffic entirely out of the cooking path. For product sourcing, a kitchen design affiliate can help narrow the field to appliance and cabinet combinations that fit the station without wasting counter depth.
The goal is self-sufficiency: someone at the beverage station should be able to get in, make their drink, and leave without touching the sink-fridge-range corridor. That requires consolidating everything they need — appliance, water, mugs, and cold storage for milk — within arm's reach of a single landing zone.
For appliance selection, KitchenAid offers countertop coffee makers and espresso machines covered under their countertop appliance warranty program, which extends to "mixers, blenders, coffee machines and more" across the US, DC, Puerto Rico, and Canada. Having a brand-consistent setup with a KitchenAid espresso machine and matching countertop appliances keeps the station looking intentional rather than cobbled together.
Best place for a coffee maker, espresso machine, and mugs
Position appliances in the sequence you use them, left to right (or right to left if that's more natural for your workflow):
- Cold storage — mini or undercounter fridge for milk, creamer, oat milk, juice
- Water access — either a plumbed machine line or proximity to a small prep sink
- Coffee maker or espresso machine — center of the station, with 15 to 18 inches of clear counter on each side for mug landing
- Mug storage — open shelf or cabinet directly above the machine so mugs come down and go back up without crossing the counter
This sequence means no one ever carries a hot drink across the kitchen looking for a mug. Everything moves in one short loop — fridge to machine to shelf and back.
Pro Tip: If you can't run a dedicated water line, choose a high-capacity reservoir espresso machine (KitchenAid's Espresso Machine with Milk Frother holds roughly 50 oz) and mount a wall-hung mug rack directly above. That setup requires only one dedicated 20-amp outlet and zero plumbing.
Storage and plumbing details for a beverage zone
A basic plug-in beverage station needs one dedicated 20-amp circuit — espresso machines with heating elements draw significant amperage and should not share a circuit with the refrigerator. If you're adding a plumbed coffee machine, budget for a water supply line stub-out behind the appliance location; a licensed plumber can typically rough this in during a broader kitchen remodel for a fraction of standalone cost.
For cold storage, Sub-Zero makes undercounter refrigerator and beverage center units that are purpose-built for this application — their UC-15BG and UC-24BG series are specifically designed for wine and beverage storage and sized to fit 15- or 24-inch cabinet openings. For a more accessible price point, GE Profile offers undercounter beverage centers that integrate with standard cabinetry. Whichever unit you specify, pull the product cut sheet before your cabinet order is finalized — undercounter fridge rough-in depths vary slightly and a half-inch discrepancy creates a cabinet installation headache.
Outlet placement: one duplex outlet at countertop height on the backsplash, positioned center of the station, handles most setups. If you're adding a plumbed machine plus a grinder plus a fridge, run a second outlet 6 inches off-center so cords don't tangle.
Prep and baking zone layout for efficient meal workflow
The prep and baking zone gives the stand mixer, cutting boards, digital scale, and mixing bowls a permanent home that doesn't interfere with the primary triangle. It functions best when it's adjacent to the triangle — close enough to the sink for washing produce and close enough to the fridge for pulling ingredients — but physically distinct enough that baking prep doesn't compete with active cooking. A KitchenAid Artisan Series stand mixer is an easy fit here, while a Bosch bowl-lift mixer or Bosch Universal Plus appeals to households that mix dense doughs more often than cake batter.
[Image: Prep and baking zone diagram — stand mixer, cutting board, ingredient canisters, and drawer storage labeled along a dedicated counter run]
Counter depth matters here. Standard 25-inch-deep counters work for most prep tasks, but if you're planning a baking zone from scratch, some designers spec a 27-inch-deep counter section to accommodate large sheet pans and a KitchenAid or Bosch stand mixer without crowding the backsplash. The KitchenAid Artisan Series 5-Quart Stand Mixer is 14 inches tall with the head up — make sure upper cabinets above the baking zone clear at least 18 inches above the counter surface, or plan for open shelving there.
A Bosch Universal Plus stand mixer is a serious alternative if you're doing high-volume bread baking — its bowl-lift design is more stable with heavy doughs than a tilt-head mixer and it fits under most standard upper cabinets at under 14 inches tall.
Counter space, mixing tools, and small appliances
A functional baking zone needs at least 36 inches of uninterrupted counter space — 48 is better if you regularly roll dough. Here's what should live there permanently versus what should be stored nearby:
Permanent countertop placement: - Stand mixer (KitchenAid or Bosch — both qualify as mainstream countertop tools per KitchenAid's own warranty coverage for countertop appliances) - Wooden or composite cutting board, at least 18 × 24 inches - Ingredient canisters (flour, sugar, salt) if you bake frequently
Stored in the zone's base or drawer cabinet: - Digital kitchen scale - Rolling pin, bench scraper, pastry tools - Measuring cups and spoons - Mixing bowls nested in a deep drawer
The point of permanent counter placement is commitment — tools that live in the prep zone never need to be retrieved from across the kitchen, and they signal to every other person in the house that this counter section is a work area, not a staging zone for mail and backpacks.
When a prep island helps and when it hurts flow
An island improves flow when it adds prep counter space without shrinking the work aisles below NKBA minimums. It hurts flow when it becomes an obstacle — a through-route that cuts across the cooking path, or a block that prevents appliance doors from fully opening.
| Island Condition | Effect on Flow |
|---|---|
| Aisles stay at 42"+ (single cook) | Helps — adds prep surface |
| Aisles stay at 48"+ (multiple cooks) | Helps — prep zone separates from main triangle |
| Aisle drops below 42" on either side | Hurts — creates bottleneck |
| Fridge or oven door swings into island | Hurts — blocks appliance access |
| Island positioned as through-traffic route | Hurts — guests cross the cooking path |
The NKBA aisle guidelines are your check: measure both sides of the island against the nearest counter or appliance. If either aisle drops below 42 inches (or 48 if two people regularly cook together), the island is too large or incorrectly positioned.
Watch Out: Many islands sold at home improvement stores are 36 inches wide. That feels substantial, but in a 10-foot-wide kitchen it leaves only two 18-inch aisles — half the NKBA minimum. Measure before you buy.
Cleanup and dish zone placement that keeps the kitchen cleaner
The cleanup zone is the most overlooked of the three secondary zones, partly because most homeowners assume the dishwasher and sink already form one. They don't — not unless storage, trash, and drying space are planned as a coherent unit. Without intentional cleanup-zone design, the area around the sink becomes a rotating pile of dish-drying racks, soap dispensers, and utensils that crowds the sink out of the work triangle. When home improvement services are brought in later to fix that tangle, the repair usually costs more than planning the zone correctly at the start.
A cleanup zone that actually works keeps everything needed for post-meal tidying within a few steps of the sink: dishwasher to one side, trash pull-out to the other (or immediately under the sink), dish drying rack or drying mat at the sink's edge, and everyday dish storage in the cabinet directly above. The goal is zero unnecessary steps between rinsing, loading, drying, and putting away.
Home improvement planning for this zone often requires the least disruption — cleanup zone improvements are frequently the most affordable zone upgrade since the sink and dishwasher are already there. A kitchen or home improvement professional can help you assess whether your cleanup zone needs new cabinet pulls, a new trash pull-out, or a full cabinet reconfiguration.
Dishwasher, trash pull-out, and sink-side storage
The dishwasher should be within 36 inches of the sink — far enough to open its door without blocking the sink, close enough to transfer dishes without dripping across the floor. Standard placement is immediately to the left or right of the sink base cabinet.
Trash pull-out: the most functional position is the cabinet directly adjacent to the dishwasher, on the opposite side from the sink. That way the scrape-and-load sequence — plate to trash, dish to dishwasher — happens in a single three-foot move. A 15-inch-wide pull-out cabinet fits a dual-bin insert (trash plus recycling) and installs in any standard base cabinet run.
Sink-side storage priorities: - One deep drawer for dish brushes, soap, sponges (under-sink cabinet or adjacent to sink) - Over-sink or wall-mounted drying rack if counter space is limited - Dish cabinet positioned directly above the drying area so clean dishes move from rack to shelf in one vertical step
Pro Tip: KraftMaid, IKEA's SEKTION line, and KraftMaid all offer pull-out trash inserts that retrofit into existing base cabinet openings. An IKEA RATIONELL dual-bin pull-out runs under $80 and fits any 18-inch cabinet opening.
How to keep cleanup traffic out of the cooking path
Cleanup and cooking create the most common kitchen bottleneck in multi-person households — the person loading the dishwasher and the person cooking are both working near the sink, from the same aisle.
The fix is spatial separation: position the cleanup zone so the dishwasher side of the sink faces away from the range. In an L-shaped kitchen, this usually means the dishwasher lands on the leg that doesn't include the range. In a galley, put the dishwasher at one end, the range at the other. In an open kitchen with an island, route cleanup traffic to the island-facing side so the cook has clear aisle access from the back.
The NKBA 42-inch/48-inch aisle benchmarks apply here too: a dishwasher door open at 90 degrees extends roughly 24 inches into the aisle. In a 42-inch aisle, that leaves 18 inches of passage — tight, but walkable. In a 36-inch aisle, the open dishwasher door blocks the path entirely.
How to measure clearances before you remodel
Measure the kitchen yourself before hiring any contractor or placing a cabinet order. Professionals will remeasure, but arriving at a remodeling consult with your own measurements and a rough sketch puts you in a stronger position to evaluate proposals and catch errors early.
The NKBA guidelines specify that clear floor space — measured between counter frontage, tall cabinets, and appliances — must be at least 42 inches for a single-cook kitchen and at least 48 inches for a kitchen where multiple people cook at the same time. These measurements come from the finished face of cabinets and appliances, not from stud walls.
Pre-remodel measuring checklist: - Measure every aisle width at its narrowest point (counter face to counter face, or counter face to island edge) - Measure all three sides of the existing work triangle and add them up - Note which doors (entry, pantry, cabinet) swing into the aisle and how far - Record fridge door swing — full-depth refrigerators need 36 to 42 inches of clearance to open fully - Mark any utilities: outlet locations, water supply lines, gas or electric range connection, dishwasher stub-out
Bring these numbers to your home improvement or remodeling consult. A designer can work with real measurements; guesses waste everyone's time and money.
Single-cook versus multi-cook aisle widths
Pro Tip: NKBA recommends 42 inches minimum for a single-cook work aisle and 48 inches minimum for multiple cooks. These are ergonomic recommendations, not building code — your municipality won't require them, but your back will thank you for following them.
The 6-inch difference between 42 and 48 inches is consequential. At 42 inches, one cook can work comfortably and a second person can pass behind without incident. At 48 inches, two cooks can stand at adjacent work areas and turn without colliding. For couples who cook together, or households where kids routinely help with dinner prep, the 48-inch standard is worth planning around from the start — retrofitting an extra 6 inches of aisle width after cabinets are installed is expensive. The triangle itself should still stay within NKBA's 4-to-9-foot legs and 13-to-26-foot total so the wider aisle does not create a slow, sprawling layout.
Doors, appliance swing, and walk-through bottlenecks
Every door in the kitchen is a potential bottleneck. Check these before finalizing any layout:
- Refrigerator door: Full-depth models (30–36 inches deep) require the door to swing 90+ degrees to access crisper drawers. Measure from the fridge face to the nearest obstacle and confirm at least 36 inches of unobstructed swing.
- Dishwasher door: Opens flat (180 degrees) and extends roughly 24 inches into the aisle. Make sure it doesn't swing into an opposite cabinet or block the sink.
- Oven door: Drop-down oven doors extend roughly 20–24 inches. Standing in front of an open oven needs 42 inches of clear space behind you.
- Entry and pantry doors: If a door swings into the work triangle, it will be propped open during cooking — and that changes your effective aisle width permanently.
Watch Out: Counter-depth refrigerators (24 inches deep) improve aisleways but sacrifice roughly 20% of interior storage volume compared to standard-depth models. If you're switching to counter-depth to gain clearance, adjust your fridge storage strategy accordingly.
What it costs to add kitchen zones to an existing layout
Adding secondary zones to an existing kitchen ranges from a free afternoon rearranging counters to a six-figure full remodel, depending on how much you want to move. The most useful way to think about it is by scope — what you're willing to change, not what you wish you could have.
Cost Snapshot: Zone retrofits: $0–$500 for surface-level reorganization; $500–$5,000 for light electrical, new appliances, and storage updates; $25,000–$80,000 for full remodels involving cabinet relocation, structural work, and new appliances throughout. Regional labor and appliance pricing vary across US markets, so verify specific project costs with a licensed contractor before committing.
Low-cost weekend updates under $500
The highest-ROI zone improvements require no permits, no contractors, and no plumbing. These are pure organization and minor hardware upgrades:
- Beverage zone: Clear a 24-inch countertop section, add a wall-mounted mug hook rail ($20–$40 at Home Depot), install a floating shelf above for coffee supplies ($30–$60), plug in your existing coffee maker or a new KitchenAid countertop model
- Prep zone: Dedicate one drawer with a bamboo divider insert for baking tools ($25–$50), add a large composite cutting board that covers the counter section ($40–$80), install a small pull-out cabinet organizer for ingredient storage ($30–$60)
- Cleanup zone: Add an IKEA RATIONELL or Rev-A-Shelf pull-out trash bin ($60–$100), install under-sink organizers to clear the cabinet for cleaning supplies ($20–$50), add a wall-mounted dish drying rack if counter space is tight ($30–$60)
Total for all three zones at this tier: under $400 if you shop selectively.
Mid-range upgrades from $500 to $5,000
This tier involves light electrical work, a new appliance or two, and possibly a cabinet modification. You'll likely need a licensed electrician for new outlet circuits and possibly a carpenter for any cabinet changes.
- Beverage zone with undercounter fridge: A GE Profile or Bosch undercounter beverage center runs $800–$1,800. Add $200–$400 for a dedicated 20-amp circuit from an electrician. Cabinet cutout modification if needed: $300–$600 from a carpenter.
- New countertop in prep zone: Replacing a single 6-foot countertop section with quartz or butcher block runs $400–$1,200 depending on material and labor market.
- KitchenAid Stand Mixer purchase for the baking zone: The Artisan Series runs $400–$500 at retail — treat it as a zone investment, not just an appliance.
- Bosch 500 Series dishwasher upgrade for the cleanup zone: $900–$1,200 installed, with meaningfully quieter operation (44 dBA) than most builder-grade units.
A remodeling consult from a certified kitchen designer (NKBA-certified designers charge $150–$400 per hour for consulting) can help you sequence these mid-range upgrades intelligently so each one supports the next phase of work rather than having to be undone.
Higher-end remodeling moves for $25,000 to $80,000 projects
A full kitchen remodel at this scale lets you relocate anything — cabinets, appliances, utilities — and design the work triangle and secondary zones from scratch. This is where the ergonomic planning pays the biggest dividend, because fixing a bad layout after the cabinets are in costs far more than getting it right the first time.
At this budget, a contractor-level sequence that actually improves daily function and resale appeal typically looks like:
- Structural and utility rough-in first: Move electrical panels, gas lines, plumbing supply and drain before any cabinets arrive. Changes after cabinets are installed are exponentially more expensive.
- Triangle optimization: Relocate the range, sink, or fridge to bring the triangle into NKBA compliance if the existing layout is outside spec.
- Zone infrastructure: Rough in dedicated circuits for beverage zone, plan cabinet cutouts for undercounter appliances, confirm water access for prep sink if desired.
- Cabinets and counters: Custom or semi-custom cabinets from brands like KraftMaid or a local cabinet shop allow zone-specific storage design — deep drawers for the prep zone, pull-outs in the cleanup zone, open shelving at the beverage station.
- Appliances last: Sub-Zero integrated refrigeration, a GE Profile or KitchenAid professional range, and a Bosch or Miele dishwasher should be spec'd by model number before the cabinet layout is finalized so cutout dimensions are correct.
Get at least three bids from licensed general contractors and verify each one includes a licensed plumber and electrician on the team — not subcontractors they've never worked with before.
When to keep the triangle and when to ask a designer for help
Most zone upgrades under $500 are straightforward DIY work — rearranging counters, adding shelves, swapping hardware. Once you move into anything involving new circuits, plumbing stub-outs, appliance relocation, or cabinet changes, a professional kitchen designer or licensed contractor saves money in the long run by preventing costly sequencing errors. If you are comparing bids, a remodeling consult is the right time to verify appliance cut sheets, cabinet depths, and utility rough-ins with home improvement services before anything is ordered.
DIY vs Pro: If your planned change involves only surface-level reorganization, a new plug-in appliance, or floating shelves — DIY is appropriate. If your plan requires moving an outlet, adding a water line, removing or relocating a cabinet, or changing where the range, sink, or fridge sits — bring in a pro before purchasing anything.
Signs your layout needs a professional kitchen designer
Upgrade to professional design help when any of these apply:
- Structural: You want to move a wall, widen a doorway, or create an opening between kitchen and living area
- Electrical: You need a new 20-amp circuit for a beverage zone, a 240V line for an induction range, or additional outlets that aren't near existing panels
- Plumbing: You're relocating the sink, adding a prep sink, running a water line to a coffee machine, or moving the dishwasher to a new position
- Appliance relocation: Moving the fridge, range, or sink changes the work triangle — that requires a full layout review, not just a tape measure
- Permit triggers: Any structural change, plumbing move, or electrical panel work requires permits in most US municipalities; unpermitted work affects home sale inspections
An NKBA-certified kitchen designer brings code knowledge, product sourcing, and contractor coordination that a design blog cannot replicate. For a $25K+ project, their fee is typically offset by material and sequencing savings within the first few weeks.
How to get a better return on layout changes
The highest-return kitchen upgrades combine functional improvement with buyer appeal. An efficient work triangle makes a kitchen feel larger and more organized — that's a tangible selling point. Secondary zones signal intentional design and modern living to buyers, which differentiates a kitchen from the sea of builder-grade layouts still common in most resale inventory.
Focus upgrades in this sequence for the best combination of daily usability and resale appeal:
- Triangle compliance first — buyers and agents notice cramped or awkward cooking paths immediately
- Cleanup zone second — an organized sink area with a quality dishwasher (Bosch is a recognized name buyers respond to) reads as premium
- Beverage zone third — it photographs well and communicates lifestyle
- Prep zone last — meaningful to serious cooks but less universally compelling to buyers who may not bake
Prioritizing triangle compliance over cosmetic finishes is the consistent advice from kitchen designers working in active resale markets: a kitchen that works earns more than a kitchen that looks good on Instagram but frustrates anyone actually cooking in it.
Kitchen work triangle FAQs for modern homeowners
Is the kitchen work triangle outdated in 2026?
Is the kitchen work triangle outdated in 2026?
No. The work triangle remains the ergonomic baseline for kitchen efficiency — that hasn't changed because human movement patterns in a kitchen haven't changed. What has changed is that a triangle alone isn't sufficient for how modern households use the kitchen beyond cooking. The 2026 answer is the triangle plus secondary zones: keep the triangle as the functional core (compliant with NKBA's 4-to-9-foot legs and 26-foot total), and layer beverage, prep, and cleanup zones around it to handle the broader way families actually live in their kitchens today. Blogs that dismiss the triangle as outdated are offering opinion without the NKBA standards to back it up.How much space should be between kitchen work areas?
How much space should be between kitchen work areas?
Between any two points in the work triangle, the NKBA specifies a minimum of 4 feet and a maximum of 9 feet per leg. For the aisle running through the working kitchen, [NKBA recommends 42 inches for a single cook](https://media.nkba.org/uploads/2022/05/Kitchen-Planning-Guidelines.pdf) and 48 inches for multiple cooks. These aisle widths are measured between the finished face of opposing cabinets, counters, or appliances — not from wall to wall. Put together, the triangle still needs to stay within NKBA's 13-to-26-foot total while the aisle clearance stays at 42 inches or 48 inches depending on how many people cook at once.What is a kitchen zone layout?
What is a kitchen zone layout?
A kitchen zone layout is a planning approach that assigns distinct activity areas for specific tasks, such as a beverage station, a baking counter, or a cleanup area; for example, a beverage zone positioned at the end of an island keeps a partner making coffee from cutting through the sink-fridge-range triangle while dinner is being cooked.Sources & References
- NKBA Kitchen Planning Guidelines (PDF) — Official NKBA planning guidelines specifying work triangle dimensions, aisle widths, and work-center standards
- NKBA Planning Guidelines Overview — NKBA's description of the guidelines as an "essential reference" for kitchen and bath design
- NKBA Kitchen Design Tips for Aging Population — NKBA source identifying the cooktop/stove, refrigerator, and sink as the three core work-triangle centers
- KitchenAid Countertop Appliance Warranty — Confirms warranty coverage for KitchenAid coffee machines, espresso machines, and mixers in the US, DC, Puerto Rico, and Canada
- KitchenAid Countertop Appliances — Product category page for KitchenAid countertop kitchen appliances
- GE Profile Kitchen Appliances — GE Profile appliance lineup including wall ovens, microwave drawers, and beverage centers
- Bosch Home Appliances US — Bosch undercounter refrigerators and dishwashers for US market
- Sub-Zero Undercounter Refrigeration — Sub-Zero undercounter beverage and refrigeration products
Keywords: NKBA kitchen planning guidelines, sink-fridge-range work triangle, 4 to 9 foot triangle legs, 13 to 26 foot total triangle, 42-inch clear floor space, 48-inch clear floor space, open-concept kitchen zoning, coffee and beverage station, prep and baking zone, cleanup and dish zone, KitchenAid, Bosch, Sub-Zero, GE Profile, Whirlpool